
Home Improvement
When the Smoke Clears: Finding Your Way Back Home


A house fire changes everything in minutes. One moment you’re living your normal life, and the next you’re standing outside watching firefighters battle flames that are consuming years of memories. Once the smoke clears and the fire trucks leave, a new, quieter crisis begins: figuring out what comes next.
Recovery from a fire involves more than just rebuilding walls. It touches every part of a home, from smoke-stained ceilings to water-logged carpets left behind by firefighting efforts. For homeowners in this situation, understanding what the recovery process actually looks like can make an overwhelming time feel a little more manageable.
At Atex Restoration, we’ve guided countless families through this exact journey. Below, we’ll walk through what fire damage really costs, the hidden risks that linger long after the flames are out, and why the choices you make in the first 24 hours matter more than you might think.
Understanding the True Cost of Fire Damage
Fire damage rarely stays contained to the room where it started. Heat warps structural materials, smoke travels through ventilation systems into rooms that never saw a flame, and soot settles into fabrics, electronics, and HVAC systems throughout the entire house.
According to the National Fire Protection Association, U.S. fire departments responded to roughly 1.35 million fires in 2022, resulting in billions of dollars in property damage nationwide. Behind each of those statistics is a family facing decisions about insurance claims, temporary housing, and the daunting task of restoring a space that no longer feels safe.
The financial toll often surprises homeowners. Beyond the obvious destruction, there’s often extensive smoke odor removal, soot cleanup, and structural repairs required even in areas that look untouched at first glance. This is why a thorough, professional assessment matters so much before any restoration work begins.
The Hidden Dangers Lurking After a Fire
What you can’t see can hurt you. Even after visible flames are extinguished, a property can harbor serious risks that aren’t obvious to an untrained eye.
Smoke residue carries toxic particles that settle into walls, furniture, and air ducts, creating respiratory hazards that persist long after the fire is out. Water damage from firefighting efforts can lead to mold growth within 24 to 48 hours if left untreated, adding a second disaster on top of the first. Structural weaknesses may be invisible to the untrained eye but can compromise the safety of floors, walls, and ceilings.
This combination of risks is exactly why DIY cleanup after a significant fire is rarely a good idea. Professionals bring specialized equipment, like industrial air scrubbers and moisture meters, that identify and address these dangers before they escalate into bigger problems.
Why Quick Action Makes All the Difference
Timing shapes the outcome of fire recovery more than almost any other factor. The first 24 to 48 hours after a fire are critical for preventing secondary damage like mold growth, corrosion, and permanent staining.
Soot, for example, becomes significantly harder to remove the longer it sits. Acidic residue can etch into glass, corrode metal fixtures, and permanently discolor surfaces within just a few days. Similarly, water used to extinguish the fire needs to be extracted and dried quickly to prevent mold colonies from taking hold.
This is why choosing a restoration partner that can respond quickly matters so much. A fast response doesn’t just speed up the timeline, it genuinely reduces the total scope and cost of repairs needed.
What to Expect During Professional Recovery
Fire Damage Restoration handled by trained professionals brings structure and clarity to what otherwise feels like chaos, guiding homeowners through each stage with a clear plan instead of guesswork. The process typically starts with a detailed inspection to assess the full extent of damage, including areas affected by smoke and water that aren’t immediately visible.
From there, technicians secure the property against further damage, often boarding up windows or covering damaged roofing. Next comes water extraction and drying, followed by the removal of soot and smoke residue from every affected surface. Specialized deodorization techniques then tackle smoke odor at its source rather than simply masking it.
Finally, the rebuilding phase begins, restoring damaged structures and finishes so the home looks and feels like it did before the fire, or better. Throughout this process, a trustworthy restoration team also works directly with insurance adjusters, helping homeowners document losses accurately and avoid disputes over claims.
Taking the First Step Toward Recovery
Recovering from a house fire is rarely easy, but it doesn’t have to be a journey you take alone. Having a knowledgeable team by your side can turn an overwhelming situation into a manageable, step-by-step process, one that prioritizes your safety, your home, and your peace of mind.
At Atex Restoration, we understand how disorienting this experience can be, and we’re committed to helping families restore not just their properties but their sense of normalcy. If you’re facing the aftermath of a fire, reaching out to experienced professionals early can make all the difference in how smoothly your recovery unfolds.
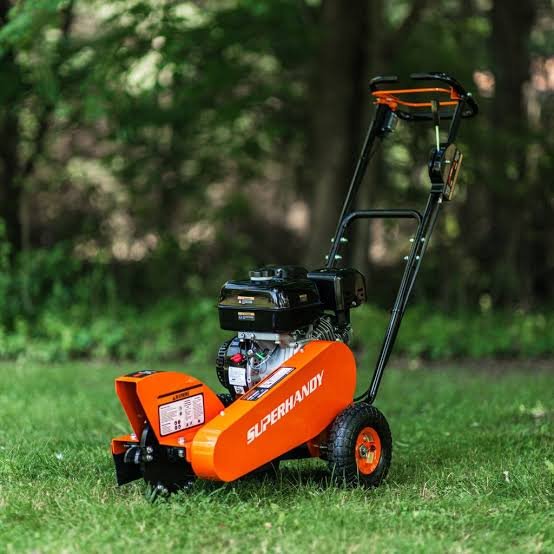
Tree removal is often necessary when a tree becomes damaged, diseased, unstable, or unsuitable for the surrounding landscape, but removing the trunk does not always complete the job. The remaining stump can occupy valuable outdoor space, interfere with lawn maintenance, attract unwanted pests, and create obstacles for people moving around the property. Over time, an untreated stump may begin to decay, develop fungal growth, and become increasingly difficult to incorporate into an attractive landscape design. Professional stump grinding offers a practical way to address these concerns by reducing the remaining wood below the surrounding ground level. With the appropriate equipment and a carefully planned approach, property owners can reclaim valuable space, improve the appearance of their yards, and prepare the ground for future landscaping projects. Understanding how a stump grinder works, what factors influence the process, and how the area should be restored afterward can help property owners make informed decisions about maintaining a safe, functional, and visually appealing outdoor environment.
- Understanding the Importance of Stump Removal
- How a Stump Grinder Works
- Choosing the Right Equipment for the Job
- Improving the Appearance of Your Landscape
- Supporting Safer Outdoor Activities
- Preparing the Property Before Grinding Begins
- Managing Wood Chips and Grinding Debris
- Preparing the Ground for New Grass and Plants
- Understanding the Benefits of Professional Service
- Factors That Influence the Cost and Duration
- Maintaining the Landscape After Stump Grinding
- Making Better Use of Available Outdoor Space
- Conclusion
Understanding the Importance of Stump Removal
After a tree has been cut down, the remaining stump may appear relatively harmless, particularly when it is located away from busy walkways or frequently used outdoor areas. However, the stump can gradually become a practical problem as the surrounding grass grows, exposed roots interfere with maintenance, and the wood begins to deteriorate. A large stump may prevent property owners from mowing the lawn efficiently, installing new plants, or creating a consistent landscape design. It can also make outdoor spaces look unfinished, especially when the rest of the property is carefully maintained. In some situations, the stump may encourage unwanted insects or provide a place where fungi develop as the wood decomposes. Although these concerns do not occur in every situation, they demonstrate why leaving a stump untreated may not be the most suitable long-term decision. Evaluating the stump’s condition, location, and effect on everyday activities helps determine whether grinding would provide a practical improvement. Removing the visible obstruction can make the surrounding space easier to maintain while creating more opportunities for landscaping, planting, and other outdoor improvements.
How a Stump Grinder Works
A stump grinder is specialized machinery designed to break down the remaining wood of a tree after the trunk has been removed. Most machines use a rotating cutting wheel fitted with durable teeth that gradually grind the stump into small wood chips. The operator moves the cutting mechanism across the wood in controlled passes, reducing the stump until the desired depth and width have been achieved. The exact process depends on the machine’s design, the stump’s dimensions, the type of wood, and the condition of the surrounding ground. Some stumps can be processed relatively quickly, while larger or denser stumps may require additional time and more careful equipment positioning. Professional operators also consider nearby buildings, fences, walkways, irrigation systems, and underground utilities before beginning the work. This preparation helps reduce unnecessary disruption and supports a more controlled process. Unlike complete stump excavation, grinding generally focuses on reducing the stump and selected root sections rather than removing the entire root system. The resulting wood chips can then be managed according to the property’s needs, and the area can be prepared for soil replacement or further landscape improvements.
Choosing the Right Equipment for the Job
Different stumps require different approaches, so selecting suitable equipment is an important part of effective stump removal. A compact grinder may be appropriate for a smaller stump in a confined backyard where access through a narrow gate is limited. Larger stumps or dense hardwoods may require more powerful machinery capable of handling the additional cutting demands. Ground conditions also influence equipment selection because soft soil, slopes, uneven surfaces, and delicate landscaping can make machine positioning more challenging. Before choosing a machine, the operator should assess the stump’s diameter, visible root structure, wood condition, surrounding obstacles, and required grinding depth. Access routes should also be evaluated to determine whether the equipment can reach the work area without damaging lawns, paving, or garden features. The goal is to select a machine that can complete the work efficiently while respecting the limitations of the property. Appropriate equipment selection can reduce unnecessary delays, improve control, and help ensure that the finished area meets the property owner’s expectations. A professional assessment is particularly valuable when a stump is located close to structures or within a heavily landscaped section of the yard.
Improving the Appearance of Your Landscape
A remaining stump can interrupt the visual balance of an otherwise attractive outdoor space. Even when the lawn is healthy and the surrounding plants are well maintained, exposed wood may make the property look neglected or unfinished. Removing the visible stump through grinding creates an opportunity to restore the area and integrate it into the surrounding landscape design. Property owners may choose to establish new grass, extend an existing flower bed, introduce suitable shrubs, or create a more open area for outdoor activities. The best choice depends on the amount of available sunlight, soil condition, drainage, and the intended purpose of the space. A well-planned restoration can also help maintain a consistent appearance across the yard by eliminating awkward obstacles and uneven patches. However, grinding alone does not automatically produce a finished lawn. Wood chips, disturbed soil, and shallow depressions may remain after the machinery has completed its work. Proper cleanup, grading, and soil preparation are therefore important if the goal is to create a smooth, attractive surface. By considering the entire restoration process, property owners can turn an area that previously contained an unwanted stump into a useful part of the landscape.
Supporting Safer Outdoor Activities
Stumps and exposed roots can create obstacles in areas where people walk, play, work, or maintain the lawn. Grass may gradually conceal uneven ground, making a stump or root flare more difficult to see, particularly when the yard is covered with leaves or when lighting is limited. Lawn equipment can also strike exposed wood, potentially damaging cutting blades or making routine maintenance more complicated. These concerns are especially relevant in frequently used spaces where people expect a relatively clear and predictable walking surface. Grinding a stump below ground level can reduce the visible obstruction and make the surrounding area easier to manage. Nevertheless, property owners should understand that grinding does not necessarily eliminate every root or guarantee that the entire area becomes perfectly level without additional work. Remaining roots may continue to affect the ground as they decompose, and the disturbed soil may settle over time. Appropriate grading and restoration can help address these issues and improve the usability of the space. When planning the work, it is helpful to consider the needs of family members, visitors, lawn care workers, and anyone else who regularly uses the property.
Preparing the Property Before Grinding Begins
Careful preparation helps make stump grinding more efficient and reduces the likelihood of avoidable problems. Before work starts, the operator should inspect the area for rocks, metal objects, garden ornaments, irrigation components, landscape lighting, and other materials that could interfere with the cutting process. Known underground utilities must be identified, and appropriate utility-locating procedures should be completed before grinding near potentially buried services. The work area should be cleared of movable furniture, toys, tools, and other loose objects that could obstruct equipment access or become hazards during operation. Property owners should also discuss nearby fences, retaining walls, paved surfaces, and valuable plants with the service provider. Depending on the location, protective measures may be necessary to reduce the chance of damage from equipment movement or flying debris. Children, pets, and other bystanders should remain outside the designated work zone while machinery is operating. Taking these precautions creates a more organized working environment and allows the operator to concentrate on the task. Discussing access limitations and restoration goals in advance also helps establish realistic expectations about the work and the condition of the area when the service is complete.
Managing Wood Chips and Grinding Debris
The grinding process produces wood chips and smaller pieces of organic material, and deciding how to manage this debris is an important part of project planning. The amount of material depends on the stump’s size, the grinding depth, the wood’s density, and the extent of the root structure being processed. Some property owners prefer to keep suitable wood chips for limited landscaping uses, while others want the material removed to make room for grass or a different ground covering. The best approach depends on the intended use of the area and the condition of the resulting material. Fresh grinding debris should not automatically be spread in thick layers around every plant because excessive wood material can affect soil conditions and interfere with the establishment of some landscaping features. When preparing an area for grass, removing excess chips and adding suitable topsoil may provide a better foundation for growth. If the goal is to extend a garden bed, the soil and planting requirements should be considered before deciding how much debris to retain. Discussing cleanup options before work begins helps property owners understand what the service includes and whether additional hauling, grading, or soil preparation will be required.
Preparing the Ground for New Grass and Plants
After grinding is complete, the disturbed area may need additional attention before it is ready for planting or other improvements. Because the stump and surrounding roots have been reduced into wood chips, the remaining material can settle as it decomposes. Covering the area with a thin layer of soil without removing excess debris may lead to an uneven surface later. A more suitable restoration process may involve clearing surplus chips, adding appropriate topsoil, grading the ground, and allowing for some settling before completing the final surface treatment. For grass establishment, the soil should be prepared to provide suitable growing conditions, and the selected seed or turf should match the area’s sunlight, moisture, and maintenance requirements. New garden beds may need a different approach depending on the types of plants being introduced and the available soil depth. Property owners should also consider drainage because poorly directed water can affect the restored area and surrounding landscaping. If the space will be used for paving, a shed, or another substantial structure, professional advice may be necessary because stump grinding does not provide the same result as removing the complete root system. Matching ground preparation to the intended use helps reduce future problems and supports a more successful restoration.
Understanding the Benefits of Professional Service
Operating a stump grinder requires appropriate training, protective equipment, and an understanding of the risks associated with powerful cutting machinery. The rotating wheel can generate flying debris, and incorrect equipment positioning may create hazards for the operator, nearby people, or surrounding property. Working close to buildings, fences, underground services, and delicate landscaping can make the task more complicated. Professional tree care providers can evaluate these conditions, select suitable equipment, and determine an appropriate grinding approach. They can also explain the expected depth of the work, identify possible access challenges, and discuss whether additional cleanup or restoration is needed. Experience can be particularly useful when the stump is unusually large, the wood is dense, the root structure is extensive, or the available working space is restricted. Rather than focusing only on the visible stump, a qualified provider can consider how the grinding process will affect the surrounding ground and the property’s future use. This broader approach helps property owners understand the complete scope of the project and make decisions based on practical requirements. Professional service also reduces the need for property owners to operate unfamiliar machinery or attempt potentially hazardous work without the appropriate equipment and experience.
Factors That Influence the Cost and Duration
The cost and duration of stump grinding depend on several factors, so every project should be evaluated according to its individual conditions. Stump diameter is an important consideration because larger stumps generally require more cutting and produce greater quantities of debris. Wood density and species can also influence how quickly the material can be processed, while extensive roots may increase the amount of work required around the base. Access is another important factor because equipment may be difficult to position in narrow spaces or areas with limited clearance. Sloping ground, nearby landscaping, underground utilities, and restrictions on debris removal can introduce additional planning requirements. The desired grinding depth also affects the work involved, particularly when the area will be used for a specific landscaping project. When several stumps are located on the same property, completing them during one scheduled visit may help organize the work, although the overall requirements will depend on their locations and sizes. Property owners can support accurate planning by identifying all stumps that need attention, describing the intended use of each area, and sharing information about known underground installations. A clear assessment before the work begins helps establish realistic expectations about timing, cleanup, and any additional restoration services.
Maintaining the Landscape After Stump Grinding
Once a stump has been ground down and the surrounding area restored, ongoing landscape maintenance can help preserve the results. Property owners should monitor the ground for settling, particularly during the first period after restoration, because remaining organic material may decompose and create shallow depressions. Adding soil and adjusting the grade when necessary can help maintain a more consistent surface. Newly planted grass should receive appropriate watering and care according to the selected seed or turf requirements, while garden beds should be maintained according to the needs of their plants. It is also useful to inspect nearby trees periodically and address damaged branches, declining health, or structural concerns before they create larger problems. When removing a tree becomes necessary, considering stump treatment as part of the overall project can help avoid leaving an obstacle that interferes with future maintenance. Thoughtful planting decisions are equally important because new trees should have enough room to develop without creating unnecessary conflicts with buildings, paved areas, or underground services. Combining stump removal with a broader landscape maintenance plan helps property owners keep their outdoor spaces functional and attractive over the long term.
Making Better Use of Available Outdoor Space
Every property has different requirements, and removing an unwanted stump can create opportunities to use outdoor space more effectively. A previously obstructed section of lawn may become suitable for seating, planting, children’s activities, or easier equipment access. In a commercial setting, clearing an unnecessary stump may improve the appearance and accessibility of landscaped grounds, provided the work is coordinated with the property’s operational needs. Before choosing the next use for the area, property owners should evaluate the ground condition, drainage, sunlight, available space, and any remaining roots that could affect the proposed improvement. A landscape designer or qualified contractor may be helpful when the area will become part of a larger renovation or installation project. It is also worth considering how the new arrangement will affect regular maintenance, including mowing access, irrigation, and the care of nearby plants. Planning the next stage before grinding begins can help determine the appropriate working depth and debris management approach. This coordinated process makes it easier to transition from stump removal to a useful improvement rather than treating the grinding work as an isolated task.
Conclusion
An unwanted tree stump can interfere with lawn maintenance, restrict landscaping options, and make an outdoor space appear unfinished. Professional stump grinding offers a practical solution by reducing the remaining wood below ground level and creating an opportunity to restore the area for future use. Successful results depend on several important considerations, including equipment selection, site preparation, operator safety, debris management, soil restoration, and the intended use of the ground after the work is complete. Property owners should evaluate these factors before beginning a project so they can establish realistic expectations and choose an approach that suits their landscape. Working with an experienced tree care provider can help address difficult access conditions, protect nearby features, and determine whether additional grading or planting preparation is necessary. With appropriate planning and follow-up maintenance, the area can become easier to manage and better suited to the property’s needs. Choosing a professional stump grinder stump grinder stump grinder service can help property owners take an important step toward a cleaner, safer, and more functional outdoor environment.

Choosing an air conditioning system can feel confusing because each option works quite differently. Australian homes usually come down to three choices: single-split, multi-split, and ducted.
The short answer: single-split suits one or two main rooms, multi-split suits several selected rooms, and ducted suits whole-home comfort. Your home’s size, layout, and budget decide the rest, and an air conditioning government rebate may bring the upfront cost down, depending on the system and current eligibility rules.
The sections below compare the three side by side.
What Is a Single-Split Air Conditioner?
A single-split system has one indoor unit connected to one outdoor unit. It heats or cools one room or area, so you’ll often see it in bedrooms, living rooms, home offices, and smaller apartments.
The biggest advantage is simplicity. You can install one in the room you use most without changing anything else in your home. Other benefits include:
- Lower upfront cost
- Simple installation
- Easy to operate
- Efficient when you only run it where you need it
It’s a good fit if you spend most of your time in one or two rooms. If you want to control the temperature in several rooms, though, adding more single-splits gets less convenient, and you may end up with several outdoor units depending on your layout.
What Is a Multi-Split System?
A multi-split connects one outdoor unit to multiple indoor units. You could, for example, run the living room, main bedroom, and a second bedroom from a single outdoor unit. Each indoor unit generally works on its own, so different rooms can have different temperature settings.
Its main benefits include:
- Several rooms conditioned from one system
- Individual room control
- Fewer outdoor units
- Flexible installation
- No existing ductwork needed
It’s a practical middle ground between single-split and ducted. Before choosing one, work out how many rooms you want to condition and whether the outdoor unit can support the indoor units you have in mind.
What Is Ducted Air Conditioning?
Ducted air conditioning heats or cools multiple areas through a network of ducts. The main unit usually sits out of sight in the ceiling or roof space, and vents spread the conditioned air through the home. Homeowners often consider it when they want whole-home comfort rather than treating rooms one by one.
Benefits can include:
- Whole-home heating and cooling
- A clean, built-in look
- Zoning, so you choose which areas get heating or cooling
- Centralised control
- A good match for larger homes
The main drawback is cost. Ducted systems cost more to install than a basic single-split, and installation gets more involved in an existing home without suitable roof or ceiling access.
Single-Split vs Multi-Split vs Ducted
No system wins every time, because each suits a different home.
| Feature | Single-Split | Multi-Split | Ducted |
| Best for | One or two main rooms | Several selected rooms | Whole-home comfort |
| Installation | Simple | Moderate | More involved |
| Outdoor units | One per system | Usually one | Usually one main unit |
| Room control | Excellent | Excellent | Good with zoning |
| Upfront cost | Lower | Medium | Higher |
| Whole-home coverage | No | Partial | Yes |
| Ductwork needed | No | No | Yes (existing or new) |
Your layout should drive the decision. A single-split may be enough for a small apartment. A multi-split often makes more sense for a three-bedroom home where only the bedrooms and living room need conditioning. For a larger house where you want consistent comfort across several areas, ducted is worth considering.
What About Running Costs?
The purchase price is only one part of the decision. How you use the system matters just as much.
If you only need to cool your bedroom at night, a single-split in that room makes more sense than conditioning the whole house. If several rooms need heating or cooling every day, running multiple separate units gets impractical.
Two other points are worth knowing. Ducted systems tend to be less efficient than split and multi-split systems because some energy escapes through the ductwork. And bigger isn’t automatically better. A system that’s too large for a room can switch on and off in short bursts, which can mean uneven temperatures, higher energy costs, and extra wear on the unit.
Also look at the star ratings, your home’s insulation, room sizes, and how often you expect to use the system.
Can a Rebate Help With the Cost?
Upfront cost matters, particularly for larger systems. A Victorian government split system rebate isn’t tied to the system type alone. It depends mostly on what you replace and how big the new system is, and replacing a gas heater earns the biggest discounts.
Here are the indicative household maximums from the Victorian Government’s heating and cooling discounts page:
| You replace | You install | Indicative discount |
| Non-ducted (room) gas heater | Single-split, 3 kW to 9 kW | $630 to $1,610 |
| Ducted gas heater | Multi-split, one 10 kW outdoor unit | Up to $2,940 |
| Ducted gas heater | Ducted syst item, 22.4 kW | Up to $5,530 |
| Nothing (no heater removed) | Single-split, 3 kW to 9 kW | $70 to $140 |
Two rule changes matter if you’re eyeing a larger system. Since 30 September 2026, the minimum co-payment is $3,000 including GST for ducted systems and for multi-splits of 10 kW or more. Multi-splits under 10 kW stay at $1,000, and incentives for residential multi-splits now stop at 20 kW of capacity.
Not every air conditioner qualifies. The system must be an approved model with a minimum 5-year warranty, an accredited provider must apply the discount, and any system you’re replacing must be more than two years old. If you’re chasing an air conditioning government rebate, confirm the current air conditioner rebate rules and eligible products first rather than relying on old information.
Which System Should You Choose?
For making a decision, just think about your home and your daily routine.
Choose Single-Split If:
- You mainly need one room conditioned
- You have a smaller home or apartment
- You want a lower-cost installation
- You don’t need whole-home heating and cooling
Choose Multi-Split If:
- You need air conditioning in several rooms
- You want separate temperature control
- You’d rather not have multiple outdoor units
- You want more coverage without a full ducted installation
Choose Ducted If:
- You want whole-home heating and cooling
- You have a larger home
- You like a built-in look
- Zoning is important to you
- You’re comfortable with a more involved installation
Get Your Home Assessed Before You Buy
A qualified installer can look at room sizes, insulation, windows, existing ductwork, electrical requirements, and the best spot for the indoor and outdoor units. The VEU program says an onsite load assessment by your installer is the best way to size a system correctly.
They can also give you the total installation cost and tell you whether your choice may meet the requirements for a Victorian government split system rebate or another incentive.
Conclusion
Single-split, multi-split, and ducted all have their place. A single-split is simple and affordable for individual rooms, a multi-split gives flexible control across several rooms, and ducted suits homeowners who want whole-home comfort.
Before you buy, compare installation and running costs, check the system’s efficiency, and confirm whether you qualify for an air conditioning government rebate. If you’re in Victoria, also check the latest rules for a Victorian government split system rebate. A little time comparing options certainly helps you land on a system that fits your home and your budget.
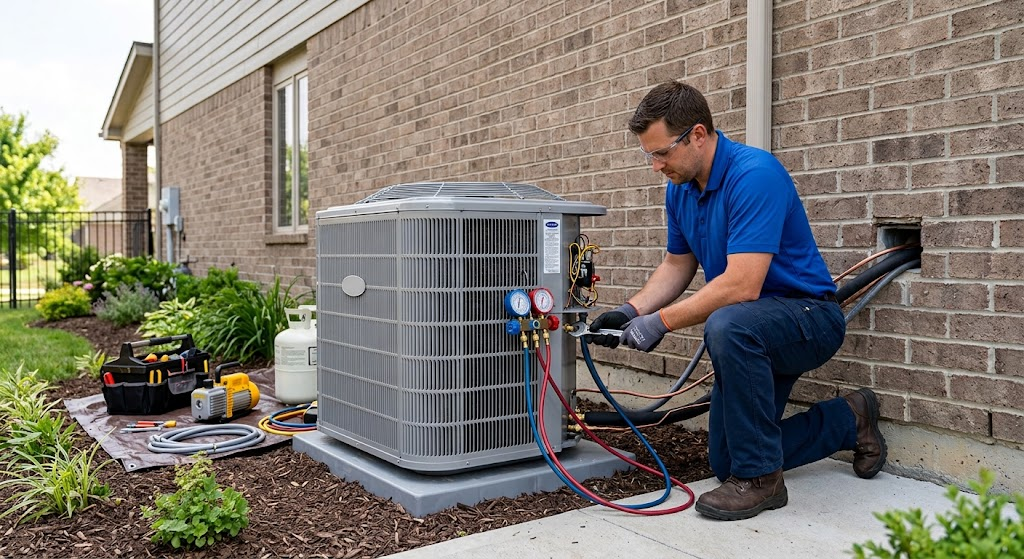
Summer heat has a way of exposing every weakness in a home’s cooling system. An aging unit struggles to keep up, energy bills climb, and that one stuffy upstairs bedroom never quite cools down. For many homeowners, the solution isn’t repairing an old system again. It’s investing in a new one, installed correctly from the start.
- Why Installation Quality Matters More Than the Equipment Itself
- What Goes Into a Professional Installation
- Load Calculations Determine the Right System Size
- Ductwork Inspection and Sealing Improve Airflow
- Proper Refrigerant Charging Protects Long-Term Performance
- Thermostat Calibration Ties the System Together
- The Real Cost of Cutting Corners
- How to Know You’re Getting a Quality Installation
- Comfort That Lasts, Backed by Experience
- Make Your Next Cooling Investment Count
A properly installed air conditioning system does more than lower the temperature. It affects your comfort, your utility costs, and the lifespan of the equipment itself. Yet installation is often treated as an afterthought, something to rush through once the unit is purchased. That mindset costs homeowners thousands of dollars over the life of a system.
At Nuvo HVAC, we’ve seen firsthand how the right installation transforms a home’s comfort and efficiency. This post walks through why installation quality matters so much, what separates a good job from a mediocre one, and how to know you’re making a smart investment in your home’s cooling future.
Why Installation Quality Matters More Than the Equipment Itself
It’s tempting to think that buying the most expensive, highest-rated air conditioner guarantees the best results. In reality, even premium units underperform when installed poorly. Industry research has repeatedly shown that improper installation can reduce a system’s efficiency by 30% or more, effectively erasing the benefits of upgrading to a high-efficiency model in the first place.
Think of it this way: a sports car with a poorly tuned engine won’t perform like one that’s been properly calibrated. The same logic applies to cooling systems. Refrigerant levels, ductwork sizing, airflow balance, and electrical connections all need to be precise. When even one of these elements is off, the entire system compensates by working harder, which drives up energy consumption and accelerates wear on components.
This is why choosing an experienced team matters just as much as choosing the right equipment. Technicians who understand load calculations, duct design, and manufacturer specifications set homeowners up for years of reliable performance rather than a string of service calls.
What Goes Into a Professional Installation
A quality installation isn’t a single task. It’s a sequence of carefully executed steps, each one affecting how well the system performs for years to come.
Load Calculations Determine the Right System Size
Before any equipment gets selected, a proper installation starts with a Manual J load calculation. This assessment factors in your home’s square footage, insulation levels, window placement, and even local climate data to determine exactly how much cooling capacity your home needs. Skipping this step is one of the most common and costly mistakes in the industry. An oversized unit cools too quickly without properly removing humidity, while an undersized one runs constantly and still struggles to keep up on the hottest days.
Ductwork Inspection and Sealing Improve Airflow
Even the best air conditioner can’t perform well if the ductwork is leaking, undersized, or poorly routed. Professional installers inspect existing ductwork for leaks and airflow restrictions, making adjustments or repairs where needed. According to the U.S. Department of Energy, homes can lose up to 20-30% of conditioned air due to leaks, holes, and poorly connected ducts. Addressing this during installation ensures the cool air actually reaches every room, rather than escaping into the attic or walls.
Proper Refrigerant Charging Protects Long-Term Performance
Refrigerant levels need to match manufacturer specifications exactly. Too little refrigerant reduces cooling capacity, while too much can damage the compressor and shorten the unit’s lifespan. This step requires precision tools and training, which is why it’s best left to experienced technicians rather than a quick DIY fix.
Thermostat Calibration Ties the System Together
Once the hardware is in place, your thermostat needs to communicate properly with the system. Calibration ensures accurate temperature readings and smooth cycling, preventing the unit from short-cycling or running longer than necessary.
The Real Cost of Cutting Corners
Homeowners sometimes choose the lowest bid for installation, assuming all contractors offer the same quality of work. This assumption can be expensive. Poor installation often shows up gradually: higher energy bills, uneven cooling between rooms, frequent repairs, and a shortened equipment lifespan. A system that should last 15 to 20 years might only make it to 10 or 12 if installed incorrectly from the start.
There’s also the matter of warranty protection. Many manufacturers require proof of professional installation to honor their warranties. Cutting corners on installation can void coverage entirely, leaving homeowners responsible for the full cost of repairs or replacement parts down the line.
Choosing quality installation from the outset isn’t just about comfort. It’s a financial decision that pays off through lower energy bills, fewer repairs, and a system that reaches its full expected lifespan.
How to Know You’re Getting a Quality Installation
Not every homeowner has the technical background to evaluate HVAC work, but there are a few signs that point to a trustworthy installation team.
Ask about load calculations. A reputable technician will always perform or reference a Manual J calculation rather than guessing at system size based on square footage alone.
Request ductwork evaluation. If a contractor skips inspecting your existing ducts, that’s a red flag. Ductwork condition directly affects system performance.
Check for proper licensing and certification. NATE-certified technicians (North American Technician Excellence) have demonstrated a verified level of expertise in HVAC installation and service.
Look for manufacturer-specific training. Installers familiar with your chosen equipment brand are more likely to follow the precise specifications needed for optimal performance and warranty compliance.
Comfort That Lasts, Backed by Experience
Comfortable, consistent temperatures throughout your home start with professional AC installation, something our team at Nuvo HVAC treats as a craft rather than a checklist. We know that every home has unique airflow challenges, insulation quirks, and cooling needs, which is why we take the time to calculate, inspect, and calibrate every system before calling the job complete.
Our technicians are trained to the manufacturer’s exact specifications, ensuring your new system performs at its rated efficiency from day one. We also stand behind our work with service guarantees, so you’re never left wondering whether the job was done right.
If your current system is struggling to keep up, or if you’re building a new space that needs reliable cooling, it’s worth working with a team that understands how much installation quality matters. Cooling your home shouldn’t come with guesswork or compromise.
Make Your Next Cooling Investment Count
A new air conditioning system is a significant investment, and how it’s installed determines whether that investment pays off for the next two decades or creates headaches within the first two years. Taking the time to choose an experienced installation team protects your comfort, your energy bills, and your equipment’s lifespan.
Ready to experience the difference a professional installation makes? Reach out to Nuvo HVAC today to schedule a consultation and get expert guidance tailored to your home’s specific cooling needs.

Guide to Sending Diwali Sweets and Gifts to Loved Ones in the USA

How Family Dentistry Prepares Children For Lifelong Dental Confidence

How Dentists Use Layered Composite To Recreate Depth And Dimension

Alex Pettyfer Net Worth, Wife, Age, Height, Children, Career and More

Brad Williams Net Worth, Wife, Height, Age, Daughter, Family, Career and More

Eldorado.gg Review 2026: How It Works, Safety, Fees, and Risks
-
Celebrity10 months ago
Alex Pettyfer Net Worth, Wife, Age, Height, Children, Career and More
-
Celebrity10 months ago
Brad Williams Net Worth, Wife, Height, Age, Daughter, Family, Career and More
-
Blog1 month ago
Eldorado.gg Review 2026: How It Works, Safety, Fees, and Risks
-
 Anime11 months ago
Sanzoku Bandits of One Piece: Origins, Higuma, and Their Role in Dawn Island
-
 Celebrity10 months ago
John McGinn Net Worth, Age, Height, Wife, Childrens, Career and More
-
 Celebrity10 months ago
Frances de la Tour Net Worth, Age, Height, Husband, Childrens, Career and More
-
 Celebrity10 months ago
Will Trickett Net Worth, Wife, Childrens, Age, Career and More
-
 Blog2 months ago
Crackstube: A Complete Guide to the Digital Publishing Platform