
Construction
Creating a Beautiful and Functional Pond: A Complete Guide to Planning, Construction, and Care


A pond can completely change the character of an outdoor space by adding beauty, movement, sound, and a natural focal point. Whether it is designed as a peaceful garden feature, a habitat for fish and aquatic plants, or an entertaining area with waterfalls and lighting, a pond requires thoughtful planning to achieve lasting results. The construction process involves several important decisions, including location, size, depth, materials, drainage, filtration, circulation, and landscaping. A Pond contractor can help coordinate these elements and turn a basic idea into a carefully planned water feature. Professional knowledge can also reduce common construction problems and make future maintenance easier. With the right approach, a pond can become an attractive addition that complements the property and provides enjoyment throughout the year.
- Planning the Pond Before Construction
- Selecting the Right Pond Size
- Finding a Suitable Location
- Preparing the Ground Properly
- Selecting Reliable Pond Materials
- Creating Efficient Water Circulation
- Installing Proper Filtration
- Adding Aquatic Plants
- Using Rocks and Decorative Stone
- Incorporating Waterfalls and Streams
- Considering Pond Lighting
- Designing a Healthy Fish Habitat
- Preventing Water Quality Problems
- Managing Pond Drainage
- Making Maintenance Convenient
- Integrating the Pond With the Landscape
- Preparing for Seasonal Changes
- Creating an Enjoyable Outdoor Environment
- Supporting Long-Term Pond Performance
- Choosing Professional Pond Construction
- Conclusion
Planning the Pond Before Construction
Successful pond construction starts with a clear plan that considers both appearance and functionality. Homeowners should think about the purpose of the pond, the desired shape, available space, preferred features, and expected maintenance requirements before work begins. A Pond contractor can evaluate these goals and create a design that balances the homeowner’s ideas with practical construction requirements. The plan may include areas for aquatic plants, fish, waterfalls, streams, rocks, fountains, and lighting. It should also account for equipment placement and convenient access for future servicing. Careful planning reduces the possibility of making expensive changes after construction has started. A detailed design gives the entire project direction and helps ensure that each part of the pond works together properly.
Selecting the Right Pond Size
The size of a pond should be determined by the available outdoor space and the intended purpose of the feature. A small pond may be suitable for a compact garden, while a larger property may allow for a more expansive design with waterfalls, streams, or fish habitats. The size also affects the volume of water that must be circulated and filtered. A Pond contractor can help determine dimensions that provide enough room for the desired features without overwhelming the surrounding landscape. The depth should also be carefully considered, particularly if the pond will contain fish or aquatic plants. Choosing the right dimensions from the beginning can improve both the appearance and performance of the completed water feature. A balanced size can also make ongoing maintenance more manageable.
Finding a Suitable Location
The location of a pond can influence sunlight exposure, drainage, water quality, maintenance, and overall visibility. A site with excessive direct sunlight may encourage algae growth, while a heavily shaded area may not provide suitable conditions for certain plants. Nearby trees can add natural beauty but may also contribute leaves, branches, pollen, and other organic debris. A Pond contractor can assess the surrounding landscape and identify factors that may affect the pond before construction begins. The water feature should ideally be visible from areas where homeowners spend time so that it can be enjoyed regularly. Maintenance access should also be considered when selecting the location. Proper placement can make the pond more attractive and reduce some of the challenges associated with long-term care.
Preparing the Ground Properly
Ground preparation is one of the most important stages of pond construction. The area needs to be excavated according to the planned shape and depth, while the base should be prepared carefully before water-retaining materials are installed. Soil conditions can vary significantly, so the construction approach may need to be adjusted depending on the site. A Pond contractor can evaluate the ground and determine the appropriate preparation methods for the planned structure. Uneven or unstable ground can create problems later if it is not addressed properly. The pond edges should also be carefully shaped to support a stable transition between water and surrounding landscape. Proper preparation provides a stronger foundation and helps reduce the risk of shifting, settling, or other structural issues.
Selecting Reliable Pond Materials
The materials used in a pond can influence its durability, appearance, and maintenance requirements. Flexible liners are commonly used for certain designs, while concrete, stone, prefabricated structures, and other materials may be suitable for different projects. Each option has specific characteristics that should be considered based on the size, shape, and intended use of the pond. A Pond contractor can explain the available materials and help select options appropriate for the design. Proper installation is equally important because even quality materials can fail when they are incorrectly fitted or supported. Water-retaining surfaces need to be installed carefully, and edges should be secured to prevent unwanted movement. Investing in suitable materials and proper installation can support the long-term reliability of the water feature.
Creating Efficient Water Circulation
Water circulation is essential for maintaining a healthy and visually appealing pond. Moving water can help distribute oxygen and prevent stagnant areas from developing. Pumps, waterfalls, streams, fountains, and filtration systems can all contribute to circulation. The equipment should be selected based on the pond’s size, volume, depth, and planned features. A Pond contractor can determine the appropriate circulation requirements and position pumps and outlets to encourage consistent movement. Efficient circulation can also improve the visual effect of waterfalls and fountains while supporting better water conditions. A system that is too weak may fail to move water effectively, while an unnecessarily powerful system can increase operating demands. Proper planning creates a more balanced and practical circulation system.
Installing Proper Filtration
A pond naturally collects leaves, sediment, plant material, dust, and other debris. Without effective filtration, these materials can affect water clarity and overall conditions. A suitable filtration system can help capture unwanted particles and support cleaner water. The type and capacity of the filter should correspond to the size and purpose of the pond. A Pond contractor can coordinate filtration with pumps, drains, skimmers, and other components to create an integrated system. Equipment should also be positioned where it can be accessed easily for routine inspection and cleaning. Filtration does not eliminate maintenance, but it can make water management more manageable. A properly selected system can contribute to clearer water and a more attractive pond environment.
Adding Aquatic Plants
Aquatic plants can bring color, texture, and natural beauty to a pond. They may also provide shade and shelter for fish and other aquatic organisms. However, plants need to be selected carefully because different varieties require different water depths, sunlight levels, and growing conditions. A Pond contractor can help determine which plants are suitable for different sections of the water feature. Floating plants can add visual interest to the water surface, while submerged and marginal plants can create layers around the edges. Plant quantities should also be managed to prevent excessive growth and organic material. Thoughtful planting can soften hard construction lines and help the pond blend naturally into its surroundings. A balanced plant design can improve appearance without creating unnecessary maintenance difficulties.
Using Rocks and Decorative Stone
Rocks and decorative stone can add texture and structure to the pond while helping it blend with the surrounding landscape. Larger stones can create focal points, while smaller rocks and gravel can fill gaps and soften transitions around the water. Stone can also be used to conceal liners, support waterfalls, and define pond edges. A Pond contractor can position these materials according to the overall design so that the result appears natural and balanced. Stones should be stable and placed carefully to prevent shifting or interfering with equipment. Their size and color should also complement the surrounding landscape. Properly arranged stonework can give the pond a more finished appearance and create visual depth throughout the feature.
Incorporating Waterfalls and Streams
Waterfalls and streams can make a pond more dynamic by adding movement and sound. The sound of flowing water can create a relaxing atmosphere, while the movement itself adds visual interest. However, these features require careful planning to ensure that water flows properly and does not escape from the intended path. A Pond contractor can design the waterfall or stream around the circulation system and select an appropriate pump for the desired flow. Rocks can be positioned to guide water naturally and reduce unnecessary splashing. The size of the waterfall should also be proportional to the pond so that the feature feels balanced. Proper construction can create a beautiful focal point while maintaining efficient water movement.
Considering Pond Lighting
Lighting can allow homeowners to enjoy their pond during the evening and highlight important design features after dark. Underwater lights can illuminate plants and fish, while landscape lighting can emphasize rocks, waterfalls, pathways, and surrounding vegetation. A Pond contractor can help coordinate lighting with the overall layout so that fixtures are positioned effectively. Electrical equipment around water should be installed with appropriate safety considerations and suitable components. Lighting should generally enhance the pond rather than overpower it with excessive brightness. Soft illumination can create attractive reflections across the water surface and highlight movement. Planning the lighting during construction can make installation more convenient and reduce the need for future modifications.
Designing a Healthy Fish Habitat
Adding fish to a pond requires more planning than creating a purely decorative water feature. Fish need sufficient space, oxygen, suitable water conditions, appropriate depth, and places to shelter. The filtration and circulation systems should also be capable of supporting the biological activity created by the fish population. A Pond contractor can incorporate these requirements into the original design. Plants and rocks can provide hiding places while contributing to the natural appearance of the pond. Fish populations should be kept at an appropriate level to prevent overcrowding and excessive waste. With suitable planning, the pond can provide a healthier environment for fish while remaining visually attractive. Designing the habitat correctly from the start is generally easier than attempting major changes after fish have already been introduced.
Preventing Water Quality Problems
Water quality can be affected by several factors, including debris, poor circulation, excessive organic material, overfeeding fish, and inadequate filtration. Algae can also become a concern when conditions encourage rapid growth. A Pond contractor can design the pond with circulation, filtration, plant placement, and sunlight exposure in mind to help create more manageable water conditions. Regular maintenance will still be necessary because outdoor ponds naturally collect debris and experience environmental changes. Removing leaves, cleaning filters, monitoring water conditions, and managing plant growth can support a healthier pond. Early attention to changing water conditions can also prevent small issues from becoming more difficult to manage. Good design combined with consistent care provides a practical approach to long-term water quality.
Managing Pond Drainage
Proper drainage is essential because surrounding rainwater can carry soil, fertilizer, leaves, and other materials into the pond. Excessive runoff may affect water clarity, increase sediment, and potentially cause erosion around pond edges. A Pond contractor can evaluate the property’s slope and design drainage solutions that help control unwanted water movement. The surrounding ground can be shaped to direct runoff away from vulnerable areas. Drainage should also account for periods of heavier rainfall and changing seasonal conditions. Effective water management protects the pond while helping preserve surrounding landscaping. Addressing drainage during the original construction is preferable to attempting to correct major runoff problems after the pond is complete.
Making Maintenance Convenient
Pond ownership involves ongoing maintenance, but thoughtful design can make routine care considerably easier. Filters need cleaning, pumps require inspection, leaves need removal, and plants may need trimming throughout the year. Equipment that is difficult to reach can make these tasks unnecessarily frustrating. A Pond contractor can position pumps, filters, drains, and other components where they can be accessed without disturbing the surrounding landscape. Adequate space should also be left around the pond for cleaning and maintenance activities. Designing with future care in mind helps protect the appearance and functionality of the water feature. A pond should be considered a long-term landscape investment rather than a feature that requires attention only during construction.
Integrating the Pond With the Landscape
The surrounding landscape plays an important role in how naturally a pond fits into the property. Plants, pathways, patios, seating areas, rocks, and garden features can all be used to create a cohesive outdoor environment. A Pond contractor can coordinate these elements so that the water feature connects naturally with the rest of the landscape. Curved edges and layered planting can soften the boundaries between water and land. Seating can be positioned near the pond to create a comfortable place for relaxation, while pathways can provide convenient access for maintenance. The goal should be to make the pond feel like a natural part of the outdoor space. A well-integrated design can increase both the visual appeal and practical value of the feature.
Preparing for Seasonal Changes
Outdoor ponds are affected by changing temperatures, rainfall, sunlight, plant growth, and falling leaves throughout the year. These conditions can influence water levels, water clarity, plant growth, and maintenance requirements. A Pond contractor can consider seasonal conditions when selecting materials, equipment, plants, and drainage solutions. Homeowners should also understand that maintenance requirements may change throughout the year. For example, falling leaves may require more frequent removal during certain periods, while aquatic plants may need trimming as they grow. Pumps and filters should be inspected regularly to ensure they continue operating properly. Preparing for predictable seasonal changes can help homeowners maintain the pond more effectively and reduce unexpected problems.
Creating an Enjoyable Outdoor Environment
A pond can become a central part of an outdoor living area by providing a place to relax, entertain guests, observe aquatic life, and enjoy the sound of moving water. The feature can be designed around the way the property is used so that it serves more than a decorative purpose. A Pond contractor can help position the pond, seating, pathways, plants, and other features to create an inviting environment. Waterfalls and fountains can add sound and movement, while lighting can make the area enjoyable during evening hours. The surrounding landscape can also be designed to provide shade, privacy, and comfortable viewing areas. When these elements work together, the pond can become an important part of everyday outdoor living.
Supporting Long-Term Pond Performance
A pond should be designed with its future performance in mind rather than focusing only on its appearance immediately after installation. Materials, equipment, drainage, filtration, circulation, and maintenance access all contribute to long-term reliability. A Pond contractor can help homeowners understand the ongoing requirements associated with different designs and features. Regular inspections can help identify problems such as leaks, damaged components, excessive algae, shifting stones, or unusual water loss. Addressing these issues early can reduce the likelihood of more complicated repairs. Long-term care also includes maintaining plants, cleaning equipment, removing debris, and monitoring the general condition of the pond. Consistent attention can help preserve the beauty and functionality of the water feature.
Choosing Professional Pond Construction
Choosing the right professional can have a major influence on the quality of the finished project. Homeowners should discuss their preferred design, intended pond use, desired features, maintenance expectations, and available space before construction begins. A Pond contractor should be able to explain important decisions involving materials, drainage, circulation, filtration, lighting, and landscaping. Clear communication helps ensure that the proposed design reflects the homeowner’s goals. Experience with different pond styles and construction challenges can also provide valuable insight during planning. A professional approach can help coordinate the many components involved in building a functional water feature. Taking time to select suitable expertise can provide a stronger foundation for both construction and long-term pond care.
Conclusion
Creating a beautiful and functional pond requires careful planning, quality construction, appropriate equipment, and consistent maintenance. From choosing the location and size to installing filtration, circulation, lighting, plants, rocks, and waterfalls, every component contributes to the final result. Professional guidance can help homeowners coordinate these elements and avoid common problems associated with poor design or installation. A Pond contractor can also help integrate the water feature with the surrounding landscape so that it feels natural and complements the property. With suitable materials, effective water management, and a practical maintenance routine, a pond can remain attractive and enjoyable for many years. Investing in careful planning and professional construction can turn an outdoor space into a relaxing environment that provides lasting beauty and everyday enjoyment.

A roof is one of the most important protective components of any building, shielding the interior from rain, wind, sunlight, debris, and changing weather conditions. Because the roof is constantly exposed to the elements, small problems can gradually develop into leaks, structural deterioration, insulation issues, mold growth, and expensive repairs. Many roofing problems are difficult to notice from the ground, which makes regular inspection an important part of responsible property maintenance. A thorough roof inspection can identify early warning signs and provide valuable information about the current condition of roofing materials.
- Why Regular Roof Inspections Matter
- What a Professional Roof Inspection Includes
- Inspecting Roofing Materials
- Checking Flashing and Seals
- Evaluating Gutters and Downspouts
- Looking for Water Damage
- Roof Ventilation and Attic Conditions
- Inspecting Roof Penetrations
- Roof Inspections After Severe Weather
- Signs That a Roof Needs Attention
- Roof Inspection Before Buying a Property
- Roof Inspection Before Selling a Property
- Commercial Roof Inspections
- The Importance of Roof Maintenance
- Common Roof Inspection Mistakes
- How Often Should a Roof Be Inspected?
- Preparing for a Roof Inspection
- Understanding an Inspection Report
- Final Thoughts on Roof Inspection
A professional inspection is not limited to looking for obvious holes or missing shingles. It involves examining the roof surface, flashing, drainage system, ventilation, penetrations, structural components, and other areas that can affect performance. The goal is to determine whether the roof is functioning properly, whether damage is developing, and whether maintenance or repairs should be considered. Regular inspections can also help property owners plan future expenses rather than being surprised by an unexpected roofing emergency.
Why Regular Roof Inspections Matter
A roof can appear to be in good condition while developing problems beneath its visible surface. Water may enter through a small damaged area and travel along decking, insulation, framing, or interior finishes before becoming visible inside the building. By the time a ceiling stain appears, the original point of entry may be somewhere else.
Regular inspections provide an opportunity to identify vulnerable areas before they become major problems. Cracked flashing, deteriorated sealants, damaged roofing materials, blocked drainage components, and loose fixtures can often be addressed more easily when discovered early.
Inspections are also useful when buying or selling a property. Understanding the roof’s condition can help establish whether maintenance is needed and whether there are signs of previous repairs or ongoing deterioration.
What a Professional Roof Inspection Includes
A comprehensive roof inspection typically begins with an evaluation of the roof’s overall condition. The inspector looks for visible deterioration, damage, unusual wear, and areas where water may be entering the building.
Roofing materials are examined for cracks, curling, blistering, missing sections, loose components, or other signs of failure. The inspector may also assess the condition of valleys, ridges, edges, and areas around roof penetrations.
Flashing around chimneys, vents, skylights, walls, and other transitions receives particular attention because these areas can be vulnerable to water intrusion.
The drainage system is also reviewed. Gutters, downspouts, drains, and scuppers should be able to move water away from the roof efficiently. Standing water can accelerate deterioration and may indicate drainage problems.
Depending on the property and inspection scope, the inspector may also examine accessible attic spaces and interior areas for evidence of moisture.
Inspecting Roofing Materials
Different roofing materials have different characteristics and failure patterns. Asphalt shingles may develop curling, cracking, granule loss, or missing sections. Metal roofing can experience corrosion, loose fasteners, damaged seams, or deteriorated coatings.
Tile roofs can develop cracked or displaced tiles, while flat roofing systems may show membrane damage, seam problems, blistering, or areas of ponding water.
An inspector should evaluate the material according to its design and expected performance rather than applying the same criteria to every roof.Age is also an important factor. Roofing materials have varying service lives, and an older roof may require more frequent inspection even when it does not show obvious damage.
Checking Flashing and Seals
Flashing is designed to direct water away from vulnerable joints and transitions. It can be found around chimneys, vents, skylights, walls, roof edges, and other penetrations.
Damaged, corroded, loose, or poorly installed flashing can create pathways for water. Sealants around certain components may also deteriorate over time due to weather exposure.During an inspection, these areas should be examined carefully rather than assuming that the main roofing surface tells the complete story.
Repairs should address the underlying cause of the problem whenever possible. Simply applying additional sealant over damaged materials may provide only temporary protection.
Evaluating Gutters and Downspouts
A functioning drainage system is essential for protecting the roof and the building’s foundation. Gutters collect rainwater from sloped roof surfaces and direct it toward downspouts.
Leaves, branches, dirt, and other debris can obstruct water flow. When gutters become clogged, water may overflow onto walls, fascia, landscaping, or the foundation. Downspouts should also direct water far enough away from the building to reduce the risk of water accumulation near the foundation.
During a roof inspection, drainage components should be checked for blockages, sagging, separation, corrosion, and other problems that could prevent proper water movement.
Looking for Water Damage
Water damage can appear in many forms. Interior stains on ceilings or walls are obvious warning signs, but moisture may also cause peeling paint, damaged insulation, soft wood, musty odors, or discoloration.
In attic spaces, inspectors may look for damp insulation, water marks on roof decking, damaged rafters, or evidence of previous leaks.
Not every stain means there is an active roof leak. Condensation, plumbing problems, and older repaired leaks can produce similar evidence. The source should therefore be investigated before deciding on repairs. Identifying moisture problems early can help prevent deterioration of structural materials and interior finishes.
Roof Ventilation and Attic Conditions
Proper ventilation can help manage heat and moisture in attic spaces. Poor ventilation may contribute to condensation, excessive heat buildup, and deterioration of certain roofing and structural components.
An inspection can assess whether ventilation openings appear unobstructed and whether the attic environment shows signs of excessive moisture.
Insulation should also be evaluated when accessible. Poorly distributed insulation or ventilation problems can affect energy efficiency and contribute to temperature differences within the building.
The appropriate ventilation arrangement depends on the roof design, building construction, climate, and applicable requirements. Changes should be made carefully rather than adding vents without considering how the entire system works.
Inspecting Roof Penetrations
Every opening through a roof creates a potential vulnerability. Plumbing vents, exhaust vents, skylights, antennas, HVAC equipment, and other installations require appropriate flashing and sealing.
Inspectors should examine the areas around these penetrations for cracks, gaps, loose materials, deteriorated seals, and other signs of water entry.
Improperly installed equipment can sometimes damage roofing materials or interfere with drainage. When a leak appears near an interior fixture or ceiling penetration, the visible location should not automatically be assumed to be the source. Water can travel beneath roofing materials before entering the building.
Roof Inspections After Severe Weather
Severe weather can cause damage that is not immediately visible. High winds may loosen roofing materials, while hail or falling debris can create cracks, dents, or punctures.
After a major storm, a professional inspection can help determine whether the roof has sustained damage. This is especially useful when the roof is difficult or unsafe to access. Property owners should avoid climbing onto a roof immediately after severe weather. Wet surfaces, loose materials, and hidden structural damage can increase the risk of falls.
If branches or other debris are present, they should not be removed from unstable roof areas without appropriate precautions.
Signs That a Roof Needs Attention
Certain warning signs can indicate that an inspection is overdue. Persistent ceiling stains, unexplained moisture, damaged shingles, missing roofing components, visible cracks, sagging areas, or excessive granules in gutters can all justify further evaluation.
A sudden increase in heating or cooling costs may sometimes be related to building-envelope problems, although many other factors can contribute to energy changes.
Moss, algae, or vegetation growth may also warrant attention depending on the roofing material and environmental conditions. Growth itself does not automatically mean the roof is failing, but it can indicate persistent moisture. Unusual odors in attic areas can also suggest moisture or ventilation concerns.
Roof Inspection Before Buying a Property
A roof inspection can be particularly valuable during a property purchase. Replacing or repairing a roof can represent a significant expense, so understanding its condition before completing a transaction can help buyers make informed decisions.
The inspection should consider the roof’s approximate age, visible condition, previous repairs, drainage, flashing, ventilation, and evidence of moisture.
Buyers should also ask whether inspection documentation or maintenance records are available. Previous repair history can provide useful context about recurring problems.An inspection report should distinguish between immediate concerns, routine maintenance recommendations, and longer-term considerations.
Roof Inspection Before Selling a Property
Sellers can also benefit from understanding roof condition before listing a property. Discovering problems in advance provides an opportunity to address appropriate repairs or disclose known issues accurately.
A pre-sale inspection can help identify damaged materials, drainage problems, deteriorated flashing, or other concerns that might otherwise emerge during a buyer’s inspection.
Knowing the roof’s condition can also make discussions with prospective buyers more straightforward. Documentation of completed maintenance and repairs may provide useful information about the property’s upkeep.
Commercial Roof Inspections
Commercial roofs can have different designs and maintenance requirements from residential roofs. Large flat or low-slope systems may contain extensive membranes, drainage assemblies, mechanical equipment, penetrations, and rooftop installations.
Regular inspection is important because water can accumulate on low-slope surfaces when drainage systems become blocked or inadequate.
Commercial property owners and facility managers should maintain records of inspections and repairs. Documentation can help identify recurring problems and support long-term maintenance planning.Scheduled inspections can also reduce the likelihood of unexpected disruptions caused by roof leaks or structural deterioration.
The Importance of Roof Maintenance
Inspection and maintenance work together. An inspection identifies conditions that may require attention, while maintenance helps preserve the roof and prevent avoidable deterioration.
Routine maintenance may include cleaning drainage systems, removing appropriate debris, checking accessible flashing, maintaining roof-related equipment, and addressing minor defects when recommended.
However, maintenance should not involve unsafe roof access or inappropriate repairs. Some tasks require specialized equipment and training.
Property owners should follow professional recommendations and manufacturer requirements when maintaining roofing systems.
Common Roof Inspection Mistakes
One common mistake is inspecting only the roof surface. Important problems can occur around flashing, penetrations, drainage components, attic spaces, and structural areas.Another mistake is assuming that a ceiling stain identifies the exact location of a roof leak. Water can travel considerable distances before becoming visible.
Ignoring small defects can also lead to larger repair costs. A damaged flashing component or loose roofing material may become a significant source of water intrusion if left unattended.Some property owners also attempt to inspect steep or elevated roofs without proper safety equipment. Falls are among the most serious risks associated with roof work, so inaccessible or hazardous areas should be handled by qualified professionals.
How Often Should a Roof Be Inspected?
Inspection frequency depends on factors such as roof age, material, weather exposure, building design, previous repair history, and environmental conditions.
A newer roof may require routine inspection as part of general maintenance, while an older roof may benefit from more frequent evaluation.
Additional inspections can be appropriate after severe weather or when signs of leakage appear. Rather than relying solely on a fixed schedule, property owners should consider the roof’s specific condition and maintenance history. Professional recommendations can help establish an appropriate inspection plan.
Preparing for a Roof Inspection
Before an inspection, property owners can make relevant information available to the inspector. Roofing installation records, warranties, previous inspection reports, and repair documentation can provide useful background.Interior signs of moisture should also be identified. If occupants have noticed stains, leaks, unusual odors, or changes in attic conditions, these observations should be communicated.
Outdoor areas around the building should remain accessible so the inspector can examine drainage, exterior walls, roof edges, and other relevant components.Clear communication can help ensure that concerns are investigated rather than overlooked.
Understanding an Inspection Report
A professional roof inspection report should provide useful information about observed conditions. Depending on the inspection scope, it may include photographs, descriptions of damage, maintenance recommendations, and notes about areas that could not be safely accessed.
Property owners should distinguish between normal aging and conditions that require immediate repair. Not every imperfection means the roof needs replacement.When repairs are recommended, it is useful to understand their purpose and urgency. Questions about the estimated remaining service life, recurring problems, or potential consequences of delaying repairs can help with maintenance planning.A clear report can turn an inspection into a practical roadmap for managing the roof over time.
Final Thoughts on Roof Inspection
A roof inspection is an important preventive measure that can help property owners understand the condition of one of the building’s most critical protective systems. Roofing problems often begin with relatively small defects, and early identification can provide more opportunities to address them before they develop into extensive damage.
A thorough inspection should evaluate roofing materials, flashing, drainage, penetrations, ventilation, accessible attic areas, and signs of water intrusion. The roof’s age, material, construction, maintenance history, and exposure to severe weather should also be considered.
Property owners should pay attention to warning signs such as leaks, ceiling stains, damaged roofing materials, blocked gutters, sagging areas, unusual attic moisture, and visible deterioration. However, visible symptoms do not always reveal the source of a problem, which is why professional assessment can be valuable.
Regular maintenance following an inspection can extend the useful performance of a roofing system and help prevent avoidable damage. After severe weather, an additional inspection may also be appropriate, particularly when there is visible debris or suspected damage.
Most importantly, roof inspections should be approached with safety in mind. Steep, elevated, wet, or damaged roofs can be hazardous, and property owners should not attempt risky inspections themselves. Qualified professionals have the training and equipment needed to evaluate difficult areas more safely.
With consistent inspections, timely maintenance, and appropriate repairs, property owners can protect their buildings from preventable roofing problems and make more informed decisions about long-term roof care.
Construction
Essential Disaster Reconstruction Tips: Damage Assessment, Repairs, Restoration, and Prevention

A major disaster can leave a property with extensive structural, electrical, plumbing, cosmetic, and environmental damage. Fires, floods, storms, severe water leaks, structural failures, and other unexpected events can affect several parts of a building at the same time. Recovering from such an event requires more than simply repairing the most visible damage because hidden problems may remain inside walls, ceilings, floors, roofing systems, and mechanical components. Disaster reconstruction provides a structured approach for moving from emergency protection and damage assessment toward complete property restoration. A carefully planned recovery process can help property owners prioritize urgent concerns, organize repairs, protect remaining belongings, and restore the property to a safe and functional condition.
- Understanding the Scope of Property Damage
- Prioritizing Safety After a Disaster
- Documenting Damage Thoroughly
- Preventing Additional Damage
- Assessing Water Damage
- Addressing Fire and Smoke Damage
- Removing Debris Safely
- Inspecting Structural Components
- Repairing Electrical Systems
- Restoring Plumbing and HVAC Systems
- Restoring Interior Materials
- Managing Odors and Contamination
- Planning the Reconstruction Process
- Working With Qualified Professionals
- Understanding the Role of Insurance
- Improving the Property After Restoration
- Preventing Future Damage
- Final Thoughts
Understanding the Scope of Property Damage
The first step after a major disaster is understanding how extensively the property has been affected. Visible damage may include broken windows, damaged roofing, standing water, burned materials, collapsed ceilings, damaged flooring, or destroyed personal belongings. However, some of the most serious problems may not be immediately visible because water can remain inside walls, fire can weaken structural components, and smoke can travel through ventilation systems. A detailed assessment should therefore examine both visible and concealed areas whenever it is safe to do so. Understanding the complete scope of damage before permanent repairs begin can help prevent unexpected complications and provide a more accurate foundation for planning the recovery process.
Prioritizing Safety After a Disaster
Safety should always come before cleanup, cosmetic repairs, or rebuilding. A damaged building may contain unstable walls, exposed wiring, broken glass, contaminated water, sharp debris, damaged gas lines, or other hazards that are difficult to recognize without professional assessment. Property owners should avoid entering areas that appear unstable or unsafe until qualified professionals have evaluated them. Utilities may also need to be disconnected or inspected before normal activity resumes. Disaster reconstruction should begin only after immediate hazards have been identified and appropriate safety measures are in place. Establishing a secure working environment helps protect occupants, contractors, and other people involved in the recovery process while reducing the possibility of additional damage.
Documenting Damage Thoroughly
Detailed documentation can be extremely valuable after a disaster because it creates a record of the property’s condition before damaged materials are removed or repaired. Photographs and videos can capture structural damage, water intrusion, damaged belongings, smoke residue, broken fixtures, and other affected areas. Written notes can provide additional information about when the damage occurred and which areas were affected. Receipts, estimates, inventories, inspection reports, and other relevant records should also be organized in a secure location. Good documentation can help property owners communicate clearly with contractors, restoration professionals, inspectors, and insurance representatives. It also creates a useful reference throughout the recovery process as damaged areas are repaired and restored.
Preventing Additional Damage
Once the property has been made reasonably safe, temporary measures may be necessary to prevent additional deterioration. Broken windows may need to be covered, damaged roof sections may require temporary protection, and openings in exterior walls may need to be secured against weather. Standing water should be removed when it is safe and appropriate, while wet materials should be evaluated for drying or removal. Exposed areas should be protected from further rain, wind, or unauthorized access. These temporary measures do not replace permanent repairs, but they can prevent the original damage from becoming more extensive. Acting promptly can reduce secondary problems and provide a more stable environment for the detailed restoration work that follows.
Assessing Water Damage
Water damage can be especially complicated because moisture may travel far beyond the area where it first entered the property. Floodwater, burst pipes, roof leaks, appliance failures, and firefighting efforts can all introduce water into flooring, drywall, insulation, wood framing, furniture, and other materials. Some materials may appear dry while retaining moisture underneath their surfaces. Prolonged moisture can contribute to odors, deterioration, microbial growth, corrosion, and other secondary problems. Disaster reconstruction should therefore include a careful evaluation of areas exposed to water rather than focusing only on visible stains or standing water. Identifying and correcting the source of moisture is equally important because rebuilding affected areas without resolving the underlying problem can lead to recurring damage.
Addressing Fire and Smoke Damage
Fire damage often extends beyond the areas directly affected by flames. Heat can weaken structural components, while smoke and soot can spread throughout rooms, ventilation systems, ceilings, walls, furniture, and other materials. Water used during firefighting may create additional moisture-related concerns that need to be addressed alongside fire damage. A proper assessment should therefore consider structural stability, smoke residue, odors, electrical systems, water exposure, and the condition of affected materials. Some items may be cleaned and restored, while others may require replacement depending on their condition. Fire recovery requires careful coordination because rebuilding should not begin until damaged structures and essential systems have been appropriately evaluated.
Removing Debris Safely
Debris removal is an important part of the recovery process because damaged materials can make inspection, repair, and rebuilding more difficult. Broken drywall, insulation, flooring, roofing materials, glass, furniture, damaged fixtures, and other debris may need to be sorted and removed. Some materials may require special handling because of their condition or potential hazards. Debris should be removed in a controlled manner to reduce dust, accidental injury, and the spread of contaminants into unaffected areas. Once the damaged materials have been cleared, previously hidden problems may become easier to identify. A clean and organized work area also allows contractors and specialists to move safely and efficiently while completing repairs.
Inspecting Structural Components
Structural integrity should receive careful attention after a significant disaster. Walls, floors, ceilings, foundations, framing, roofing systems, and other load-bearing components may have been weakened by water, fire, impact, or severe weather. Damage that appears minor on the surface may sometimes affect components beneath the visible finish. Qualified professionals can assess structural elements and determine which components can be repaired and which may need replacement. Cosmetic improvements should not be completed before serious structural concerns are addressed. A strong reconstruction plan should prioritize the stability and safety of the building so that later stages of restoration are built on a sound foundation.
Repairing Electrical Systems
Electrical systems can become hazardous after water intrusion, fire, structural movement, or other forms of disaster damage. Wiring, outlets, switches, panels, fixtures, and other components may need inspection before they are used again. Water exposure can create hidden electrical problems even when equipment appears visually undamaged. Fire and heat can also affect insulation and electrical connections. Repairs should be performed by appropriately qualified professionals who can evaluate damaged components and determine what should be repaired, replaced, or tested. Electrical work should be coordinated with the broader rebuilding process so that repaired systems remain accessible for necessary inspections and are not damaged again during later construction activities.
Restoring Plumbing and HVAC Systems
Plumbing and HVAC equipment can also be affected during a disaster. Pipes may break, fixtures may become damaged, heating and cooling equipment may be exposed to water, and ventilation systems may collect smoke, soot, dust, or debris. These systems should be evaluated before being returned to normal operation. Damaged components may need replacement, while equipment exposed to contamination may require specialized cleaning or servicing. Disaster reconstruction often involves several trades working together, so plumbing, HVAC, and electrical repairs should be coordinated with structural and interior work. Proper sequencing can prevent newly repaired systems from being damaged during later stages of rebuilding.
Restoring Interior Materials
After structural and mechanical concerns have been addressed, interior restoration can begin. This may involve replacing drywall, insulation, flooring, ceilings, cabinetry, doors, trim, fixtures, paint, and other finishes. Material selection should take into account the type of damage and the conditions that caused it. For example, areas with recurring moisture may benefit from improved ventilation, drainage, or moisture-resistant construction details. Interior restoration should focus not only on appearance but also on durability and proper installation. Replacing damaged finishes without addressing the conditions that caused the damage can lead to recurring problems, so underlying issues should be resolved before final cosmetic work is completed.
Managing Odors and Contamination
Disasters can leave behind persistent odors caused by smoke, water damage, sewage, organic materials, chemicals, or other contaminants. Odor removal is most effective when the underlying source is identified and addressed rather than simply covered with fragrances. Smoke residues may require specialized cleaning, while water-related odors may indicate hidden moisture or damaged porous materials. Contaminated materials may need removal or specialized treatment depending on the type of exposure. Proper cleaning and ventilation can help restore affected spaces, but persistent odors should be investigated rather than repeatedly masked. A thorough recovery process considers both visible damage and environmental conditions that may continue affecting indoor comfort.
Planning the Reconstruction Process
A successful recovery project requires careful planning because many different tasks may need to be completed in a specific order. Emergency stabilization typically occurs first, followed by detailed inspection, debris removal, structural repairs, system restoration, interior rebuilding, and final finishing work. The exact sequence depends on the type and extent of damage. Disaster reconstruction may require coordination among general contractors, structural professionals, electricians, plumbers, HVAC specialists, inspectors, and other trades. Clear communication can help ensure that one stage of work does not interfere with another. A written scope of work and realistic timeline can also help property owners understand what needs to happen and how different repairs fit together.
Working With Qualified Professionals
Large-scale disaster recovery often involves specialized work that should not be attempted without appropriate training or equipment. Structural assessments, electrical repairs, plumbing work, hazardous-material handling, and certain forms of contamination cleanup may require qualified professionals. Property owners should ask potential contractors about their experience with similar projects, the services they provide, and how they document their work. Written agreements can clarify responsibilities, materials, costs, and project expectations. Disaster reconstruction is generally more organized when each professional understands their role and communicates with the other members of the recovery team. Keeping project records and maintaining regular communication can also help property owners monitor progress and address concerns as they arise.
Understanding the Role of Insurance
Insurance may play an important role in the recovery process, depending on the property’s coverage and the type of disaster involved. Policies can differ significantly, so property owners should review their individual coverage and communicate with their insurer about applicable procedures. Documentation such as photographs, videos, inventories, receipts, estimates, and professional assessments can be useful when discussing damage and repair requirements. Property owners should keep copies of important records and avoid discarding damaged items when documentation or inspection may still be necessary, unless safety requires immediate disposal. Insurance decisions should be based on the applicable policy and professional guidance rather than assumptions about what will or will not be covered.
Improving the Property After Restoration
A disaster can reveal weaknesses that may be worth addressing during the rebuilding process. Depending on the circumstances, improvements might include better drainage, stronger roofing materials, improved ventilation, updated plumbing, enhanced electrical protection, improved insulation, or more durable finishes. These upgrades should be selected based on the property’s specific vulnerabilities and practical requirements. Disaster reconstruction can provide an opportunity to restore damaged areas while also making reasonable improvements that may reduce future risks. However, improvements should be properly planned and installed rather than added without considering their effect on the overall building system. A well-designed recovery can leave the property safer, more functional, and better prepared for future challenges.
Preventing Future Damage
Preventive maintenance is an important part of completing the recovery process. Roofs should be inspected regularly, plumbing leaks should be repaired promptly, drainage systems should remain clear, and HVAC equipment should receive appropriate maintenance. Areas that previously experienced water damage should be monitored for recurring moisture, odors, or deterioration. Electrical systems should also be maintained according to applicable safety requirements. Property owners can reduce future problems by responding to small maintenance concerns before they develop into larger failures. Prevention does not eliminate every possible risk, but consistent maintenance can help identify vulnerabilities and reduce the likelihood that minor problems will become extensive property damage.
Final Thoughts
Recovering from a disaster can be a long and complex process, but careful planning can make the work more organized and manageable. Safety, documentation, damage assessment, temporary protection, debris removal, structural repairs, system restoration, and interior rebuilding all play important roles in returning a damaged property to normal use. Disaster reconstruction should address both visible damage and hidden problems so that repairs are durable rather than temporary. Working with qualified professionals, maintaining clear records, coordinating different trades, and addressing underlying causes can help support a more effective recovery. By combining immediate response with thoughtful restoration and preventative improvements, property owners can work toward rebuilding a safer, stronger, and more functional environment after a major disaster.
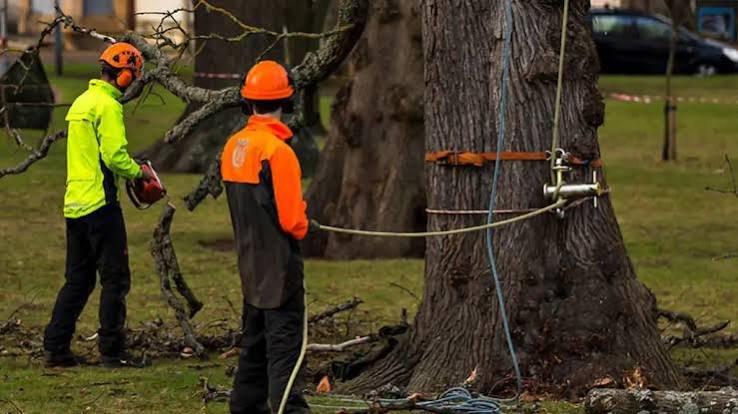
Trees are valuable parts of residential and commercial landscapes, providing shade, beauty, privacy, wildlife habitat, and environmental benefits. However, there are situations when a tree becomes hazardous, severely damaged, diseased, structurally unstable, or unsuitable for its surroundings. In these circumstances, removing the tree may be necessary to protect people, buildings, vehicles, utility lines, and other landscape features. Tree Removal is a specialized task that requires careful planning, appropriate equipment, knowledge of tree structure, and attention to safety. Although a tree may appear straightforward to cut down, its weight, height, branches, root system, surrounding structures, and environmental conditions can make removal considerably more complicated than it initially seems. Understanding when removal may be appropriate, how professionals evaluate a tree, what the removal process involves, and what property owners can do afterward can help ensure that the project is handled responsibly and efficiently.
- When Tree Removal May Be Necessary
- Recognizing Hazardous Tree Conditions
- The Importance of Professional Tree Assessment
- Why DIY Tree Removal Can Be Dangerous
- Planning the Removal Process
- Preparing the Work Area
- Understanding the Removal Techniques
- Removing Large Branches
- Handling the Tree Trunk
- Stump Removal and Stump Grinding
- Handling Wood and Debris
- Protecting Nearby Structures
- Trees Near Utility Lines
- Weather and Environmental Conditions
- Emergency Tree Situations
- Environmental Considerations
- Choosing a Tree Removal Professional
- Understanding Tree Removal Costs
- Common Mistakes to Avoid
- Maintaining the Property After Removal
- When Pruning May Be an Alternative
- Building a Long-Term Tree Care Strategy
- Final Thoughts
When Tree Removal May Be Necessary
Not every damaged or unhealthy tree needs to be removed. In many situations, pruning, cabling, bracing, disease management, or other tree-care techniques may help preserve a tree. Removal is generally considered when a tree presents a significant safety concern, has extensive irreversible damage, is dead, or cannot reasonably be maintained in its current location.
Trees that have suffered severe storm damage may have broken limbs, split trunks, exposed roots, or compromised structural connections. A tree leaning significantly toward a building or another important structure may also require professional evaluation.
Dead trees can become increasingly unstable as decay progresses. Large dead branches may break unexpectedly, while the trunk and root system may gradually lose strength. Trees affected by serious disease or advanced decay may also present hazards that require attention.
Professional assessment is valuable because appearance alone does not always reveal the actual condition of a tree. A tree can look healthy externally while having internal decay or root problems.
Recognizing Hazardous Tree Conditions
Several warning signs may indicate that a tree requires closer inspection. Large dead branches, cracks in major limbs, cavities, fungal growth near the trunk, exposed roots, damaged bark, and significant leaning can all warrant professional attention.
Multiple cracks around branch unions can be especially concerning because these areas may experience substantial structural stress. Weak attachments can fail during high winds or storms.
Root problems can also affect stability. Construction activity, soil compaction, erosion, flooding, or physical damage may compromise the root system.
Other warning signs include unusual trunk movement, extensive decay, large sections of missing bark, and branches that repeatedly break without an obvious cause.These signs do not automatically mean that a tree must be removed, but they justify an assessment by someone with appropriate tree-care expertise.
The Importance of Professional Tree Assessment
A professional tree assessment helps determine whether removal is actually necessary. An experienced arborist or qualified tree-care professional can evaluate the trunk, branches, root zone, canopy, surrounding property, and overall structural condition.
The assessment should consider the tree’s species, age, size, health, location, and surrounding environment. A tree growing near a building or power line may present different management considerations from one standing in an open area.
Professionals may also evaluate whether pruning or other corrective measures could reduce a hazard without removing the entire tree.When removal is recommended, the assessment can help establish the safest approach based on the tree’s condition and the obstacles around it.
Why DIY Tree Removal Can Be Dangerous
Tree removal is sometimes underestimated because the basic concept appears simple: cut the tree and allow it to fall. In reality, tree movement can be difficult to predict, especially when the tree is large, leaning, damaged, or located near structures.
Branches can fall unexpectedly, trunks can split, and cutting in the wrong location can cause the tree to move in an unintended direction. Ropes, ladders, chainsaws, and other equipment can also create serious hazards when used without appropriate training.
The risk becomes greater when trees are close to homes, fences, vehicles, roads, buildings, or utility lines. Working at height introduces additional fall risks, while damaged trees may be unstable before cutting even begins.For these reasons, large or hazardous trees are generally best evaluated and handled by trained professionals.
Planning the Removal Process
A successful removal begins with planning. Professionals assess the tree and its surroundings to determine how branches and trunk sections can be lowered safely.
The plan may account for the tree’s height, diameter, lean, branch distribution, wind conditions, nearby structures, access routes, and available work space.
In confined areas, the tree may need to be dismantled in sections rather than allowed to fall as a single piece. Ropes and specialized rigging equipment can be used to control the movement of branches and trunk sections.
The surrounding area may need to be cleared of people, vehicles, furniture, or other items before work begins.Good planning reduces unnecessary property damage and helps the crew maintain a controlled work environment.
Preparing the Work Area
Before removal begins, the work area should be inspected carefully. Property owners may need to move vehicles, outdoor furniture, decorations, equipment, and other movable objects away from the tree.
Professionals may establish a controlled zone to keep people away from falling branches and equipment.
Access for vehicles and machinery should also be considered. If the tree is located in a backyard or narrow area, equipment may have to be positioned differently from a tree in an open yard.Underground features can also be relevant. Irrigation lines, drainage systems, septic components, and other buried infrastructure may need to be considered before heavy equipment is used.
Understanding the Removal Techniques
Tree removal techniques vary according to the tree and surrounding conditions. In an open area where there is sufficient space and the tree is structurally sound, controlled directional felling may sometimes be possible.
In confined spaces, sectional dismantling is often more appropriate. In this method, branches and sections of the trunk are removed gradually and lowered using ropes or other equipment.Cranes may sometimes be used when trees are especially large, difficult to access, or positioned where conventional removal techniques would create excessive risk.
The technique should be selected based on the specific property rather than using the same method for every tree.
Removing Large Branches
Large branches can carry substantial weight and may have unpredictable movement when cut. Professionals generally plan cuts carefully and control branches as they are removed.
Rigging systems can allow branches to be lowered rather than dropped. This can be especially important when working above roofs, patios, fences, landscaping, or other valuable property.Removing branches in a controlled sequence can also help reduce stress on the remaining tree structure during the dismantling process.
The precise approach depends on branch size, position, attachment, and surrounding obstacles.
Handling the Tree Trunk
Once the canopy has been removed or reduced, the trunk may be cut into manageable sections. The size of these sections depends on the available space, equipment, access, and method being used.
Large trunk sections can be extremely heavy. Allowing them to fall freely may damage lawns, driveways, foundations, underground infrastructure, or other property.
Professionals may use ropes, winches, loaders, or cranes to control sections where necessary.The objective is to maintain control throughout the process and prevent unnecessary impact on surrounding structures.
Stump Removal and Stump Grinding
Removing the tree does not necessarily remove the stump. A remaining stump can interfere with landscaping, attract insects, create a tripping hazard, and make future planting or construction more difficult.
Stump grinding is one common method for reducing a stump below ground level. A specialized machine removes portions of the stump and allows the resulting material to be cleared or incorporated into the landscape according to the project requirements.
Complete stump extraction is another option in some situations, although it can disturb more soil and may require greater access.The best approach depends on the stump size, location, root structure, and intended use of the area afterward.
Handling Wood and Debris
After a tree has been removed, the property may contain branches, leaves, logs, sawdust, and other debris. Removal services may include hauling these materials away, cutting logs into firewood-sized pieces, chipping branches, or leaving certain materials on the property if the owner requests it and conditions permit.
Wood chips can sometimes be used as mulch, but they should be placed appropriately and should not be piled directly against structures.Large logs may be useful for firewood or other purposes depending on their condition and the tree species.
Property owners should clarify debris-handling arrangements before the project begins so there are no misunderstandings about what will remain after the work is completed.
Protecting Nearby Structures
One of the primary challenges of removing a tree is protecting nearby property. Trees may grow close to houses, garages, fences, sheds, decks, driveways, sidewalks, and other structures.Controlled dismantling can help minimize the risk of branches or trunk sections striking these areas.
Professionals may use ropes, rigging equipment, protective materials, and specialized machinery to control where removed sections travel.Trees growing over roofs can be particularly challenging because even relatively small branches may damage shingles, gutters, vents, or other components if they are dropped carelessly.
Trees Near Utility Lines
Trees near overhead utility lines require additional caution. Branches may come into contact with electrical conductors, communication cables, or other infrastructure.
Property owners should not attempt to cut branches that are touching or very close to energized electrical lines. Specialized professionals may need to coordinate with utility providers or follow specific safety procedures.
Equipment placement must also be considered because machinery, ladders, ropes, and branches can create dangerous contact risks.When utility lines are involved, professional evaluation is especially important before work begins.
Weather and Environmental Conditions
Weather can influence the safety of tree work. High winds, storms, lightning, heavy rain, and other unfavorable conditions can increase risks.
Wet surfaces may make equipment positioning more difficult, while strong winds can alter the movement of branches and increase the unpredictability of falling material.
Professionals may postpone work when conditions make the operation unsafe.Property owners should be cautious about requesting immediate removal during severe weather unless emergency circumstances require professional intervention.
Emergency Tree Situations
Storms can cause trees to fall onto homes, vehicles, fences, roads, and other structures. Broken trees may also remain partially attached and unstable, creating serious hazards.
In these situations, people should avoid approaching unstable trees or attempting to cut hanging branches themselves.
Emergency tree-care professionals can evaluate the situation and determine how to stabilize or remove the damaged tree.If electrical lines are involved, the relevant utility provider may also need to be contacted. Safety should take priority over clearing debris quickly.
Environmental Considerations
Trees provide ecological benefits, so removal should be considered carefully. Whenever practical, preserving healthy trees can support shade, soil stability, wildlife habitat, and landscape value.
When a tree genuinely needs to be removed, property owners can consider replacing it with an appropriate species where space and conditions allow.
The replacement tree should be selected based on mature size, root characteristics, growth rate, soil conditions, and proximity to buildings and utility infrastructure.Planting an unsuitable species in a restricted area can create future maintenance problems, so thoughtful planning is important.
Choosing a Tree Removal Professional
Choosing the right service provider is an important part of the project. Property owners should consider relevant licensing or certification requirements, insurance coverage, experience, equipment, safety practices, and customer communication.
A professional company should be willing to inspect the tree before providing a detailed recommendation. Be cautious of providers who offer a price without understanding the tree’s condition or the property’s layout.
Written estimates should explain the work being performed and clarify whether stump grinding, debris removal, cleanup, and other services are included.It is also helpful to ask about the crew’s safety procedures and how they plan to protect surrounding structures.
Understanding Tree Removal Costs
The cost of Tree Removal can vary considerably. Factors may include tree height, trunk diameter, species, health, location, accessibility, proximity to structures, utility lines, required equipment, and debris disposal.
A small tree in an open yard may be relatively straightforward, while a large tree positioned between a building and utility lines can require specialized equipment and careful sectional dismantling.
Stump grinding, emergency response, difficult access, and extensive cleanup may add to the overall project cost.
Property owners should compare estimates based on the complete scope of work rather than choosing solely on the lowest quoted price. A detailed estimate can make it easier to understand what is included and what additional services may cost.
Common Mistakes to Avoid
One common mistake is waiting until a hazardous tree fails before seeking an assessment. Regular inspections can help identify structural problems earlier.
Another mistake is assuming that a tree is safe simply because it has green leaves. Structural defects can exist even when the canopy appears healthy.
Property owners should also avoid hiring uninsured workers for complicated tree projects. If an accident damages property or injures someone, inadequate insurance can create serious complications.
Attempting to remove large trees with household tools is another significant risk. The combination of height, weight, equipment, and unpredictable movement can make professional tree work substantially more complex than it appears.
Maintaining the Property After Removal
Once the tree has been removed, the area should be evaluated for remaining roots, stump material, soil disturbance, and potential landscaping needs.
If the stump has been ground, the resulting material may need to be removed or redistributed. The area can then be leveled and prepared for grass, plants, hardscaping, or another intended use.Property owners should also inspect nearby structures for any signs of damage after difficult removals, particularly when the tree was close to a building.
If another tree is planned for the same area, the replacement should be selected based on the available space and long-term growth characteristics.
When Pruning May Be an Alternative
Removal is not always the only solution. In some cases, professional pruning can address dead, damaged, or poorly positioned branches while preserving the tree.
Crown reduction, selective pruning, deadwood removal, and structural pruning. Pruning should therefore be performed according to appropriate arboricultural practices rather than simply removing soil compaction, paving, and construction can damage root systems and create problems that may appear appropriate depending on the tree’s condition.
However, excessive pruning can weaken trees or create additional problems. Pruning should therefore be performed according to appropriate arboricultural practices rather than simply removing as many branches as possible.A professional assessment can help determine whether pruning is a reasonable alternative to complete removal.
Building a Long-Term Tree Care Strategy
Tree care should not begin only when a major problem develops. Regular observation and professional inspections can help property owners identify changes in tree health and structure.
Trees should be monitored for dead branches, cracks, decay, disease symptoms, root disturbances, and unusual leaning.
Landscaping projects should also consider existing tree roots. Excavation, soil compaction, paving, and construction can damage root systems and create problems that appear years later.A proactive maintenance strategy can sometimes preserve valuable trees while reducing the likelihood that emergency removal will become necessary.
Final Thoughts
Tree removal is a specialized service that should be approached with careful planning and a strong focus on safety. Trees can become hazardous because of structural defects, disease, decay, storm damage, root problems, or their location near buildings and utility infrastructure. However, removal should not automatically be the first solution. A professional assessment can determine whether pruning, stabilization, or another management strategy may preserve the tree.
When removal is necessary, the process should account for the tree’s size, condition, surrounding structures, access, weather, utility lines, and available equipment. Large or complicated trees may need to be dismantled in sections and lowered carefully rather than simply cut and allowed to fall.
Stump grinding, debris removal, and site cleanup are also important considerations. Property owners should clarify the scope of work before the project begins and select a service provider with appropriate experience, insurance, equipment, and safety practices.
After a tree has been removed, the property can be restored and the area evaluated for future landscaping. If another tree is planted, choosing an appropriate species and location can help prevent similar conflicts in the future.
Ultimately, tree removal is most successful when it is treated as part of a broader tree-care and property-maintenance strategy. Regular inspections, responsible pruning, proper planting, attention to root health, and timely professional evaluation can help property owners make informed decisions about the trees around their buildings while maintaining a safer and more functional landscape.

From Ertugrul to the Live Feed from Makkah: How British Muslims Binge-Watch in Ramadan

Foodie Co: Powder Blending and Manufacturing Services

What Is Tikcotech? Features and Uses Explained

Alex Pettyfer Net Worth, Wife, Age, Height, Children, Career and More

Brad Williams Net Worth, Wife, Height, Age, Daughter, Family, Career and More

Eldorado.gg Review 2026: How It Works, Safety, Fees, and Risks
-
Celebrity9 months ago
Alex Pettyfer Net Worth, Wife, Age, Height, Children, Career and More
-
Celebrity10 months ago
Brad Williams Net Worth, Wife, Height, Age, Daughter, Family, Career and More
-
Blog1 month ago
Eldorado.gg Review 2026: How It Works, Safety, Fees, and Risks
-
 Anime11 months ago
Sanzoku Bandits of One Piece: Origins, Higuma, and Their Role in Dawn Island
-
 Celebrity10 months ago
John McGinn Net Worth, Age, Height, Wife, Childrens, Career and More
-
 Celebrity10 months ago
Frances de la Tour Net Worth, Age, Height, Husband, Childrens, Career and More
-
 Celebrity10 months ago
Will Trickett Net Worth, Wife, Childrens, Age, Career and More
-
 Blog2 months ago
Crackstube: A Complete Guide to the Digital Publishing Platform