
Home Improvement
How to Choose Durable Materials and Ensure Long-Lasting Protection for Your Home


Choosing durable materials is one of the most important steps in maintaining a safe, comfortable, and attractive home. Every part of a building contributes to its overall strength, but the roof deserves particular attention because it protects the interior from rain, wind, sunlight, and changing weather conditions. A properly designed and maintained roof can help prevent moisture damage, improve indoor comfort, and preserve the property’s value. Homeowners who understand different roofing materials, installation methods, and maintenance requirements can make better decisions and avoid unnecessary repair expenses.
- Understanding the Importance of a Strong Roofing System
- Choosing Durable Roofing Materials
- The Benefits of Professional Installation
- Recognizing Signs of Roof Damage
- Improving Energy Efficiency Through Better Roofing
- Understanding Roof Ventilation and Moisture Control
- Planning a Roofing Budget
- How to Choose a Reliable Contractor
- Preventive Maintenance for Long-Term Protection
- Protecting Your Home During Severe Weather
- Long-Term Benefits of Quality Roofing
- Conclusion
Understanding the Importance of a Strong Roofing System
A reliable roofing system protects more than the rooms beneath it. It also helps preserve insulation, ceilings, walls, and structural components from moisture and environmental damage. When roofing materials deteriorate or become loose, water may enter through small openings and gradually damage the underlying structure. Problems that begin with a missing shingle or damaged flashing can eventually lead to expensive repairs if they remain unnoticed. Regular inspections and timely maintenance help identify these issues before they become more serious. Professional residential roofing services can help homeowners maintain a dependable protective barrier over their property. Experienced contractors understand how different roofing components work together, including underlayment, flashing, ventilation, insulation, and drainage systems. Their knowledge helps ensure that materials are selected appropriately and installed according to recommended procedures. Investing in quality workmanship from the beginning can improve the roof’s performance, reduce maintenance concerns, and provide greater confidence in the property’s long-term protection.
Choosing Durable Roofing Materials
Selecting suitable roofing materials requires careful consideration of durability, appearance, maintenance, and installation costs. Asphalt shingles are a popular choice because they are available in different colors and styles, making them suitable for many residential designs. Metal panels are valued for their strength, relatively low maintenance requirements, and resistance to several common forms of deterioration. Clay and concrete tiles can provide an attractive finish and a long service life when the building structure is designed to support their weight. Each material has advantages, so the best option depends on the property’s requirements. Homeowners should also consider the expected lifespan of the materials and the conditions to which the roof will be exposed. Strong sunlight, heavy rainfall, temperature changes, and powerful winds can affect roofing products differently. Manufacturer recommendations, warranty coverage, and maintenance requirements should be reviewed before making a final decision. Comparing the initial price with long-term performance can help property owners choose materials that provide better overall value. A suitable material, combined with correct installation, can support reliable protection for many years.
The Benefits of Professional Installation
Correct installation is essential because even high-quality materials may fail prematurely when they are fitted incorrectly. The process begins with inspecting the roof structure and identifying any damaged or weakened areas that require attention. Contractors may need to remove old materials, repair the roof deck, and prepare the surface before installing new protective layers. Underlayment and flashing must be fitted carefully to reduce the risk of water entering through joints and vulnerable sections. Proper preparation creates a stable foundation for the main roofing materials. Experienced residential roofing professionals follow the manufacturer’s installation instructions and pay close attention to areas that require additional protection. These include roof valleys, edges, chimneys, skylights, vents, and connections between the roof and exterior walls. Incorrect fastening, poor alignment, or inadequate sealing can create openings that allow moisture to enter the building. A final inspection helps confirm that materials are secure, drainage paths are clear, and the finished system meets the required standards. Professional workmanship can reduce preventable problems and improve the roof’s overall durability.
Recognizing Signs of Roof Damage
Identifying early signs of damage helps homeowners arrange repairs before minor defects become expensive problems. Missing shingles, cracked tiles, loose panels, and damaged flashing are common warning signs that a roof needs attention. Water stains on ceilings or upper walls may indicate a leak, even when the source is not immediately visible. Other symptoms include damp insulation, peeling paint, moldy odors, and unexplained moisture inside the attic. These issues should be assessed promptly because prolonged water exposure can affect several parts of the building. The age and maintenance history of the roof also influence its condition. Materials naturally deteriorate over time, and severe weather or poor installation can accelerate the process. Some problems may be resolved by replacing damaged components or repairing flashing, while extensive deterioration may require a larger project. A qualified contractor can inspect the roof and determine the likely source of the damage before recommending a solution. Understanding the difference between a localized repair and a complete replacement helps homeowners make practical decisions and manage their budgets effectively.
Improving Energy Efficiency Through Better Roofing
A well-designed roof can contribute to better energy efficiency by helping regulate indoor temperatures throughout the year. During warm weather, sunlight heats the roof surface and can increase temperatures in the attic and upper rooms. Suitable roofing materials, effective insulation, and appropriate ventilation can help manage heat and reduce unnecessary cooling demands. In colder conditions, insulation helps limit heat loss through the roof and supports a more comfortable indoor environment. The benefits depend on the building’s design, climate, and existing energy systems. Reflective materials may help reduce solar heat absorption under suitable conditions, while correctly installed insulation limits heat transfer between the living space and the outdoors. Ventilation is equally important because trapped heat and moisture can contribute to condensation and deterioration. These features should be planned together rather than treated as unrelated improvements. Homeowners can consult experienced contractors to evaluate their existing roof and identify practical upgrades. Improvements made during a replacement project may be easier to coordinate than changes attempted after installation is complete.
Understanding Roof Ventilation and Moisture Control
Ventilation helps regulate temperature and moisture levels in the attic or designated roof space. Without adequate airflow, humidity can accumulate and contribute to condensation, mold growth, and damage to roofing components. A properly designed system allows air to move through suitable intake and exhaust openings. The correct arrangement depends on the roof design, insulation configuration, and applicable building requirements. Simply adding more vents without assessing the existing setup may not resolve the underlying problem. Moisture control also depends on effective flashing, underlayment, and drainage. Gutters and downspouts should direct rainwater away from the building, while vulnerable joints need appropriate protection against water penetration. Homeowners should ensure that insulation does not block intended ventilation pathways and that repairs address the actual cause of moisture problems. Professional residential roofing assessments can help identify weaknesses in these areas and recommend suitable improvements. Paying attention to ventilation and drainage supports the roof’s performance and helps protect the interior structure from gradual deterioration.
Planning a Roofing Budget
The total cost of a roofing project depends on the roof’s size, slope, design complexity, material selection, and labor requirements. Additional expenses may arise when contractors discover damaged decking, deteriorated flashing, or other hidden problems during preparation. Roofs with several valleys, skylights, chimneys, or steep sections may require additional labor and specialized installation techniques. Removing old materials, disposing of construction waste, and improving ventilation can also affect the final price. Understanding these factors helps homeowners prepare a realistic budget before work begins. Property owners should request detailed written estimates that explain the materials, labor, preparation, cleanup, and warranty arrangements included in the project. Comparing several proposals can reveal important differences in product quality and the scope of work. However, the lowest quotation is not always the best option if essential protective components or repairs are excluded. Homeowners should also consider long-term maintenance expenses and the expected lifespan of the chosen materials. Keeping a reasonable contingency fund can help cover unexpected repairs discovered during installation.
How to Choose a Reliable Contractor
Selecting a qualified contractor is one of the most important decisions in any home improvement project. Homeowners should review relevant experience, appropriate licensing where required, valid insurance, customer references, and examples of completed work. It is helpful to choose a professional who understands the specific materials being considered and follows the manufacturer’s installation instructions. Clear communication is also important because it helps homeowners understand the proposed work, expected timeline, and responsibilities involved throughout the project. Before signing an agreement, property owners should carefully review the written estimate, payment schedule, material specifications, and warranty conditions. The agreement should explain how old materials will be removed, how construction waste will be handled, and what happens if unexpected damage is discovered. Reliable residential roofing contractors should answer questions clearly and provide realistic expectations about the work. Comparing professionals on experience, workmanship, and overall value rather than price alone can help homeowners avoid unnecessary complications and achieve better results.
Preventive Maintenance for Long-Term Protection
Regular maintenance helps preserve roofing materials and allows homeowners to identify developing problems before they become serious. Periodic inspections can reveal loose shingles, damaged flashing, cracked tiles, blocked gutters, and other issues that require attention. Inspections are particularly useful after severe weather or when a roof approaches the end of its expected service life. Property owners should avoid climbing onto roofs without appropriate training and safety equipment, especially when surfaces are steep, slippery, or damaged. Keeping gutters and downspouts clear helps rainwater flow away from the building and reduces the risk of water accumulation. Overhanging branches may need trimming to prevent impact damage and reduce the amount of leaves and debris collecting on the roof. Small defects should be assessed promptly because even minor openings can allow moisture to reach the underlying structure. Maintenance requirements vary by material, so homeowners should follow manufacturer recommendations and retain records of inspections and repairs. Consistent care can extend the roof’s useful life and reduce unexpected maintenance expenses.
Protecting Your Home During Severe Weather
Weather conditions can place considerable stress on roofing materials, particularly during strong winds, heavy rainfall, hail, and sudden temperature changes. Loose components, damaged flashing, and blocked drainage paths may become more serious problems when a storm occurs. Homeowners can reduce some risks by arranging routine inspections, maintaining gutters, and addressing known defects before severe weather arrives. Trees near the building should also be monitored to reduce the possibility of branches falling onto the roof. After severe weather, homeowners should look for visible damage from a safe position on the ground and arrange a professional inspection if concerns appear. Signs such as missing shingles, displaced panels, broken tiles, or interior water stains should not be ignored. Temporary protective measures may sometimes be necessary while permanent repairs are arranged, but these should be handled safely and appropriately. Reliable residential roofing maintenance focuses on identifying vulnerabilities early and ensuring that damaged components are repaired before further deterioration occurs.
Long-Term Benefits of Quality Roofing
A durable roofing system provides benefits that extend beyond protection from rain and wind. It can improve the property’s appearance, support indoor comfort, and help preserve the condition of ceilings, walls, insulation, and structural components. Quality materials and correct installation may reduce the frequency of repairs when the roof is maintained properly. A well-maintained roof can also be beneficial when evaluating a property’s condition because prospective buyers often consider the roof’s age and expected replacement costs. Investing in quality materials and professional workmanship can also provide greater confidence in the building’s long-term protection. Correct installation, effective drainage, suitable ventilation, and timely maintenance all contribute to reliable performance. Although every roof eventually requires repairs or replacement, careful planning can help maximize its useful lifespan. Homeowners who prioritize inspections and address problems promptly are better positioned to manage maintenance costs and protect their property. A dependable roof is therefore an important investment in both everyday comfort and long-term building care.
Conclusion
Choosing durable materials and ensuring professional installation are essential steps toward protecting a home for many years. Homeowners should consider material quality, installation techniques, ventilation, drainage, and maintenance requirements when planning a roofing project. Regular inspections and prompt repairs help identify problems early and reduce the likelihood of extensive moisture damage. Working with a qualified contractor also helps ensure that the selected materials are suitable for the building and installed according to recommended standards. By investing in quality residential roofing, homeowners can improve their property’s durability, appearance, and overall condition. Careful budget planning, suitable material selection, and consistent maintenance help create a reliable roofing system that performs effectively over time. Whether the project involves a new installation, a replacement, or repairs to an existing structure, taking a thoughtful approach can reduce unnecessary expenses and provide lasting protection. A well-maintained roof supports the comfort of the household while helping preserve the value of the property.
Home Improvement
Home Window Tinting: A Practical Guide to Better Privacy, Comfort, and Energy Efficiency
Introduction
A comfortable home is more than a place to relax; it is an environment where temperature, natural lighting, privacy, and energy efficiency all contribute to everyday living. Windows play a major role in creating this environment by allowing sunlight and fresh views into indoor spaces. However, excessive sunlight can also introduce unwanted heat, create glare on television and computer screens, fade furniture and flooring, and make certain rooms uncomfortable during warmer months. Homeowners often look for practical ways to enjoy natural light without dealing with these common challenges. One increasingly popular solution is home window tinting, which offers a combination of heat control, UV protection, privacy, and improved indoor comfort.
- Introduction
- What Is Home Window Tinting?
- Benefits of Installing Window Tinting in Your Home
- How Window Tinting Improves Energy Efficiency
- Different Types of Residential Window Films
- Enhancing Privacy Without Sacrificing Natural Light
- Protecting Furniture, Flooring, and Interior Decorations
- The Window Tinting Installation Process
- Factors That Influence Window Tinting Costs
- Common Mistakes to Avoid When Choosing Window Film
- Maintaining Your Tinted Windows
- Choosing the Right Window Tinting Professional
- Conclusion
Window tinting involves applying a specially designed film to the interior or, in some cases, the exterior surface of suitable window glass. Depending on the film selected, it can reduce solar heat gain, limit glare, block a significant amount of ultraviolet radiation, and change how much visibility passes through the glass. Modern films are available in different shades, finishes, and performance levels, making it possible to select an option that suits a home’s design and specific requirements. Whether the goal is to create a cooler living room, protect valuable furnishings, or improve daytime privacy, understanding the available options helps homeowners make informed decisions and achieve better long-term results.
What Is Home Window Tinting?
Home window tinting is the process of applying a thin, engineered film to glass windows to improve their performance and appearance. Unlike ordinary curtains or blinds, which primarily control light by covering the window, tinting works directly with the glass to manage sunlight transmission. Depending on the product, the film may absorb, reflect, or transmit different portions of the solar spectrum. This can help reduce heat entering through windows while maintaining a useful level of natural daylight.
Residential window films are manufactured using different materials and technologies, including dyed, metallized, ceramic, and spectrally selective designs. Dyed films primarily reduce visible light and glare through color-based absorption, while metallized films use reflective particles to help manage solar energy. Ceramic films use specialized particles to control selected wavelengths without necessarily producing a highly reflective appearance. Spectrally selective products are designed to reject a significant portion of unwanted solar energy while allowing more visible light to pass through. The performance of each product depends on its specific construction, so homeowners should compare documented specifications rather than relying on the film’s color or darkness alone.
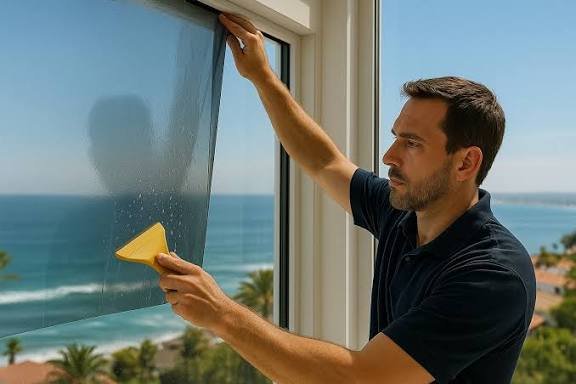
Professional installation generally involves cleaning the glass thoroughly, preparing the film with an appropriate application solution, positioning it carefully, and removing trapped moisture and air during the fitting process. Proper installation is important because dust, creases, bubbles, and poorly finished edges can affect both appearance and performance. Before selecting a film, homeowners should also confirm that it is compatible with their window type, since some films can increase thermal stress on certain glass configurations.
Benefits of Installing Window Tinting in Your Home
One of the main reasons homeowners consider residential window film is the opportunity to improve indoor comfort. Windows exposed to direct sunlight can allow considerable solar heat to enter a room, making spaces near the glass feel warmer than the rest of the house. A suitable solar-control film can reduce this heat gain, helping indoor temperatures remain more comfortable during sunny periods. Although window tinting cannot replace proper insulation, shading, or an efficient cooling system, it can be a useful part of a broader strategy for managing indoor temperatures.
Another important advantage is glare reduction. Bright sunlight entering through large windows can make reading, working, watching television, or using digital devices difficult. Tinted films can reduce excessive brightness and create a more balanced visual environment without requiring homeowners to keep curtains closed throughout the day. This can be particularly helpful in home offices, living rooms, and bedrooms with windows that receive strong direct sunlight. The appropriate level of tint depends on how the room is used and how much natural light the occupants prefer.
UV protection is also a valuable feature of many residential window films. Ultraviolet radiation can contribute to fading and deterioration in carpets, wooden flooring, artwork, upholstery, and other interior furnishings. Films designed to block UV radiation can help reduce this exposure, although fading also depends on visible light, heat, material characteristics, and other environmental factors. Window film therefore provides an additional layer of protection rather than a guarantee that furnishings will never fade.
How Window Tinting Improves Energy Efficiency
Energy efficiency is an important consideration for homeowners who want to maintain comfortable indoor temperatures without placing unnecessary demands on heating and cooling equipment. During hot weather, sunlight entering through windows can increase the cooling load, particularly in rooms with large glass surfaces or strong afternoon exposure. Solar-control window film can reduce the amount of solar energy passing through the glass, potentially helping air-conditioning systems maintain desired temperatures with less effort.
The amount of energy saved depends on several factors, including the window’s orientation, the type of existing glass, the film’s solar heat gain characteristics, the home’s insulation, local climate, and household cooling habits. South- and west-facing windows in climates with significant cooling needs may offer different opportunities for improvement than shaded windows or windows that receive limited direct sunlight. For this reason, homeowners should avoid assuming that every tinting product will deliver the same energy savings.
When evaluating films, it is useful to review measurements such as solar heat gain coefficient, visible light transmission, and total solar energy rejected. Solar heat gain coefficient indicates how much solar heat enters through the window, while visible light transmission describes how much visible light passes through the glazing and film. These measurements provide more meaningful information than descriptions such as dark, medium, or light tint. Selecting a film based on its documented performance can help homeowners balance daylight, visibility, and heat reduction according to their priorities.
Different Types of Residential Window Films
Choosing the right film begins with understanding how the available products differ. Dyed window films are often selected for their appearance and ability to reduce visible brightness. They can provide a more uniform or darker look, depending on the product, and may be suitable for homeowners primarily concerned with glare and aesthetics. However, their heat-rejection performance varies, and a darker film is not automatically more effective at controlling solar heat than a lighter, technologically advanced alternative.
Reflective and metallized films are designed to reflect some incoming solar energy away from the glass. These products may provide effective heat and glare control, but their reflective appearance can change the exterior look of a property. They can also influence how clearly people can see through the glass from different sides under varying lighting conditions. Homeowners should review the appearance during both daytime and nighttime conditions before choosing a reflective option, especially for windows facing neighboring properties or shared outdoor spaces.
Ceramic window films offer another option for homeowners seeking solar control without a strongly mirrored finish. Depending on their specifications, they can reduce selected solar wavelengths while maintaining relatively high visible light transmission. Spectrally selective films similarly focus on managing solar energy while preserving natural light, making them attractive for homes with large windows or scenic views. Frosted and decorative films serve a somewhat different purpose by obscuring direct visibility or adding patterns to the glass. These are commonly used in bathrooms, entryways, and other spaces where privacy matters more than maximizing a clear outdoor view.
Enhancing Privacy Without Sacrificing Natural Light
Privacy is a common concern in homes with street-facing windows, nearby buildings, or outdoor areas that are visible to passersby. Window tinting can help reduce visibility into a room under certain lighting conditions, allowing occupants to enjoy daylight while making it more difficult for people outside to see interior details. Reflective films are particularly associated with daytime privacy because they can create a mirror-like appearance on the brighter side of the glass.
However, privacy films do not necessarily provide the same level of concealment in every situation. One-way reflective effects depend on the difference in brightness between the two sides of the window. During the day, bright outdoor conditions may make the exterior more reflective, but at night, indoor lighting can make the interior easier to see from outside. Homeowners who need consistent privacy after dark should consider combining suitable film with curtains, blinds, or other window coverings.
Frosted films can be a practical alternative when maintaining privacy is more important than preserving a completely clear view. They diffuse visibility through the glass while still allowing varying amounts of natural light to enter, depending on the product. These films work well in bathrooms, ground-floor windows, and areas where direct views into the home should be limited. By matching the film type to the room’s purpose, homeowners can improve privacy without making every window unnecessarily dark.
Protecting Furniture, Flooring, and Interior Decorations
Sunlight can gradually change the appearance of many household materials. Upholstery, curtains, carpets, hardwood flooring, photographs, paintings, and decorative objects may fade or discolor when exposed to prolonged light and heat. Rooms with large windows can be especially vulnerable because sunlight may reach the same surfaces for several hours each day. Although the degree of damage varies by material, reducing exposure can help preserve the appearance of valuable interior items.
Many residential films block a substantial proportion of ultraviolet radiation, which is one contributor to fading. However, visible light and solar heat can also influence material deterioration, so UV protection alone does not eliminate the risk. Homeowners can improve protection by combining suitable window film with interior shading, protective window treatments, and thoughtful furniture placement. Moving valuable objects away from direct sunlight can be particularly useful when a room receives intense exposure during certain hours.
Window tinting can be an appealing option for homeowners who want to protect their interiors without permanently closing off the windows. Instead of relying entirely on heavy curtains, they can select a film that reduces harmful radiation and glare while preserving a comfortable level of daylight. This approach can help maintain the visual appeal of living spaces and reduce the need to keep blinds closed whenever sunlight becomes intense.
The Window Tinting Installation Process
A successful installation begins with an assessment of the existing windows. A professional installer should identify the type of glass, evaluate its condition, inspect the window frame, and discuss the homeowner’s objectives. This step is important because not every film is suitable for every glazing system. Double-pane windows, tinted glass, low-emissivity coatings, and certain specialty glass products may require particular care when selecting a film to avoid excessive thermal stress or compatibility problems.
Once the appropriate film has been selected, the installer cleans the glass thoroughly to remove dust, grease, residue, and other contaminants. Even small particles can become visible beneath the film and affect the finished appearance. The film is then measured and cut to fit the window, with careful attention to edges and corners. Depending on the product and installation method, an application solution is used to position the film before the installer removes trapped moisture and air with suitable tools.
After the film has been fitted, the installer checks the surface for imperfections and confirms that the edges are properly finished. Some temporary haze, small water pockets, or minor visual irregularities may occur while the film cures, depending on the product and environmental conditions. The curing period varies with film type, temperature, humidity, and sunlight exposure, so homeowners should follow the installer’s instructions regarding cleaning and window use. A professional installation can help deliver a cleaner appearance, better adhesion, and more consistent performance over time.
Factors That Influence Window Tinting Costs
The total cost of a residential tinting project depends on the number of windows, their dimensions, the type of film selected, installation complexity, and local labor rates. Larger windows generally require more material, while unusually shaped glass, skylights, high windows, or difficult-to-access areas may increase installation time. The condition of the existing glass and the need for additional preparation can also affect the final price.
Film quality is another important factor. Basic decorative or dyed films may cost less initially, while advanced ceramic or spectrally selective products may require a larger investment. Higher-priced products can offer particular performance advantages, but the most expensive option is not automatically the most appropriate for every home. A room that mainly needs glare reduction may not require the same film as a sun-exposed living area where heat control is the primary concern.
Homeowners should request detailed estimates that identify the film brand or product line, performance specifications, installation charges, warranty coverage, and any additional fees. Comparing these details helps prevent misunderstandings and makes it easier to evaluate the overall value of each proposal. It is also useful to ask about the expected service life, maintenance requirements, and conditions that may affect the warranty. A clear estimate allows homeowners to choose a solution that fits their budget without overlooking important quality considerations.
Common Mistakes to Avoid When Choosing Window Film
One of the most frequent mistakes is choosing a film based only on its darkness or exterior appearance. A darker film may reduce visible brightness, but its ability to reject solar heat depends on its construction and technical performance. Some relatively light films can provide substantial solar control while allowing more natural light to enter. Reviewing product specifications is therefore more reliable than judging effectiveness by appearance alone.
Another mistake is overlooking glass compatibility. Applying an unsuitable film to certain insulated or coated windows can increase thermal stress and potentially contribute to glass damage. Before installation, homeowners should confirm that the selected product is approved for the existing glazing system and that the manufacturer’s instructions are being followed. This is especially important when dealing with expensive, specialized, or older windows.
Homeowners should also avoid expecting window film to solve every comfort or privacy problem. Tinting cannot fully compensate for poor insulation, air leaks, inadequate ventilation, or an inefficient cooling system. Likewise, reflective films cannot guarantee nighttime privacy when indoor lights are brighter than the surrounding outdoor environment. Understanding these limitations makes it easier to develop a complete solution that combines window film with appropriate shading, insulation, and other improvements.
Maintaining Your Tinted Windows
Proper maintenance helps keep window film looking clear and performing as intended. During the initial curing period, homeowners should follow the installer’s guidance before cleaning the glass or disturbing the film. Cleaning too early can interfere with adhesion, particularly when moisture remains beneath the surface. The exact waiting period depends on the product and environmental conditions, so it is best to follow the instructions supplied with the installation.
Once the film has cured, regular cleaning with a soft cloth or non-abrasive sponge and a suitable cleaning solution can help remove dust, fingerprints, and surface marks. Harsh chemicals, abrasive pads, sharp tools, and rough scraping should be avoided because they may scratch the film or damage its protective coating. Homeowners should also take care when moving furniture or using objects near the windows to prevent accidental punctures and scratches.
Periodic inspections can help identify peeling edges, bubbling, discoloration, or other signs of deterioration. Some minor visual effects may be normal during the initial curing process, but persistent or worsening problems should be assessed by the installer. Keeping the original product details and warranty documents can make it easier to arrange service if an issue develops. With suitable cleaning practices and proper care, quality residential window film can remain functional and attractive for many years, depending on the product and exposure conditions.
Choosing the Right Window Tinting Professional
Selecting an experienced installer is essential for achieving a clean finish and reliable performance. Homeowners should look for professionals who have experience with residential glazing, understand different film technologies, and can explain the advantages and limitations of each product. References, customer reviews, examples of completed work, and evidence of relevant training can help establish whether an installer is suitable for the project.
A reputable professional should inspect the windows before recommending a particular film and should ask about the home’s sunlight exposure, privacy requirements, interior design, and comfort concerns. They should also explain visible light transmission, solar heat rejection, UV protection, reflectivity, and glass compatibility in understandable terms. Recommendations should be based on the property’s needs rather than on the assumption that one film works equally well in every room.
Before agreeing to the work, homeowners should request written details covering the selected film, installation process, expected completion time, price, warranty, and maintenance instructions. Manufacturer warranties and installation warranties may cover different issues, so both should be reviewed carefully. Taking the time to choose a qualified professional can help prevent avoidable installation problems and ensure that the selected film delivers the intended balance of comfort, privacy, and appearance.
Conclusion
Home window tinting offers a practical way to improve indoor comfort, manage sunlight, reduce glare, and protect interior furnishings from excessive ultraviolet exposure. With a wide range of films available, homeowners can select products that suit different rooms, architectural styles, privacy requirements, and energy-efficiency goals. The most suitable choice depends on the existing windows, the home’s exposure to sunlight, and the balance between natural light and solar control that occupants want to achieve.
A successful project requires more than choosing an attractive shade. Understanding film specifications, confirming compatibility with the existing glass, comparing detailed estimates, and hiring a qualified installer all contribute to a better result. Homeowners should also recognize that window film works most effectively as part of a broader approach to comfort and energy management, rather than as a complete substitute for insulation, shading, or efficient heating and cooling systems.
With careful planning, professional installation, and appropriate maintenance, residential window film can provide lasting practical and aesthetic benefits. Whether the priority is a cooler living area, reduced screen glare, improved daytime privacy, or better protection for valuable furnishings, the right window tinting solution can make a home more comfortable and enjoyable throughout the year.
Introduction
An unused room can become one of the most valuable spaces in a home when it is designed around the way you live. A spare bedroom, a section of a home gym, or an underused extension can offer the opportunity to create a private wellness area without undertaking a complete home renovation.
- 1. Look at the Room as a Complete Space
- 2. Decide Which Type of Sauna Suits Your Lifestyle
- 3. Make Florida’s Climate Part of the Plan
- 4. Choose Materials That Create the Right Atmosphere
- 5. Plan Lighting and Controls Before Installation
- 6. Think Beyond the Sauna Cabin
- 7. Understand the Professional Installation Process
- Benefits of Adding a Home Sauna
- Conclusion
A sauna can form the centre of that space, but its success depends on more than the cabin itself. Room dimensions, heating technology, electrical planning, ventilation, and interior finishes all influence the result.
For homeowners considering sauna installation Orlando, a custom approach makes it possible to work with the property’s existing layout instead of adapting daily routines around a standard unit.
1. Look at the Room as a Complete Space
Before choosing a sauna, consider how the entire room will function. You may want the sauna to be the main feature, or you may prefer a more balanced arrangement that includes seating, storage, and space for changing.
Start by measuring the available floor area and ceiling height. Check the doorways and access route to ensure the sauna components can reach the installation location. Consider the position of nearby walls, windows, and existing utilities.
A compact layout can work well when space is limited. Larger rooms offer more flexibility for additional benches or complementary wellness features.
The aim is to avoid filling every available corner. Leave suitable access around the sauna for entry, maintenance, and any clearances required by the manufacturer.
WellnessPro offers custom sauna design and fabrication, allowing the dimensions and layout to be planned around the property. Its design process can include 3D renderings, helping homeowners review the proposed arrangement before fabrication begins.
2. Decide Which Type of Sauna Suits Your Lifestyle
The heating system is one of the most important decisions because it affects the experience, equipment requirements, and design of the cabin.
Traditional electric sauna
A traditional sauna uses a heater to warm the enclosed room. Depending on the selected equipment, water can be added to suitable sauna stones to create additional humidity.
This style may suit homeowners who prefer a conventional sauna environment with wooden benches and a classic interior.
The heater must be appropriately sized for the room and installed according to the manufacturer’s specifications. The design should also account for clearances, controls, and electrical requirements.
Infrared sauna
An infrared sauna uses infrared heating technology rather than the same room-heating approach used by a traditional sauna. It offers an alternative for homeowners who prefer this style of heat.
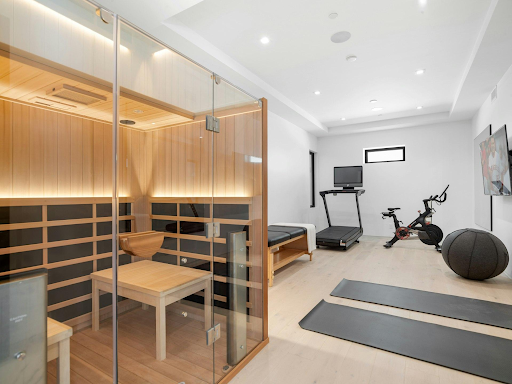
An infrared sauna Orlando can be designed to suit a spare room, dedicated wellness suite, or home gym. Cabin dimensions, seating, controls, and finishes can be selected according to the available space and intended use.
Neither option is automatically better for every household. Compare the operating instructions, equipment specifications, installation requirements, and personal preferences before making a decision.
3. Make Florida’s Climate Part of the Plan
Orlando’s warm, humid summers make moisture management an important consideration when designing a home wellness space. An indoor sauna still needs appropriate ventilation and construction details, even though it is protected from direct rain.
The surrounding room should be suitable for the installation. Discuss how the proposed sauna will affect airflow, nearby finishes, and maintenance requirements.
Outdoor installations require additional attention to weather exposure, drainage, and exterior materials. The foundation, roof protection, ventilation, and any required anchoring should suit the site and applicable local building requirements.
WellnessPro plans custom saunas for Central Florida homes with attention to humidity-aware construction and ventilation. A professional assessment can help identify the details needed for your chosen location.
Planning these requirements before fabrication is easier than trying to correct problems after the cabin has been installed.
4. Choose Materials That Create the Right Atmosphere
The materials inside a sauna influence its appearance and the overall feeling of the room. Wood can create a warm, natural contrast with the cooler finishes often found in modern homes.
WellnessPro offers several wood options, including Canadian cedar, Nordic spruce, and hemlock.
Canadian cedar has a distinctive grain and natural aroma. Nordic spruce provides a lighter appearance, while hemlock can suit a more understated design.
Your choice should reflect the home’s interior, personal preferences, and the intended application of each material. Interior paneling, benches, and exterior components may have different requirements, so discuss the full specification with the installer.
Glass can also change the appearance of a sauna. A glazed door or panel may help the cabin feel more open, while a more enclosed design can provide a different visual style. The final arrangement should balance aesthetics, privacy, and the manufacturer’s safety requirements.
5. Plan Lighting and Controls Before Installation
Lighting can make a wellness room feel like a considered part of the home rather than a separate utility space.
Soft ambient lighting can establish a relaxed atmosphere. Optional chromotherapy lighting provides another customization choice, while smart controls may offer convenient operation when compatible with the selected equipment.
Sound preparation can also be considered if you want to include audio in the wider wellness area.
These features are easier to coordinate during the design stage. Electrical connections, control placement, and equipment compatibility should be confirmed before construction begins.
Avoid adding features simply because they are available. A practical setup with reliable heating, suitable ventilation, comfortable seating, and well-planned lighting may serve you better than an unnecessarily complicated system.
6. Think Beyond the Sauna Cabin
A dedicated wellness room can include additional features if the space and budget allow. The important thing is to create a layout that supports your routine without becoming crowded.
For example, a nearby shower may be useful for convenience. A small changing area can help keep towels and clothing organized. A comfortable chair outside the sauna provides a place to sit, while built-in storage can reduce clutter.
Some homeowners may also consider a cold plunge or a home gym as part of a larger wellness project. These additions require their own space, electrical or plumbing planning, and maintenance considerations.
WellnessPro also provides cold plunge and broader wellness-space solutions. Discussing the overall room plan at the beginning can help coordinate the different elements and avoid having to redesign the space later.
7. Understand the Professional Installation Process
A custom sauna project usually involves several connected stages.
Consultation and assessment: The installer reviews your intended use, preferred location, available space, and design priorities.
Design development: Dimensions, materials, seating, heating equipment, and optional features are selected. Renderings can help you visualize the proposed result.
Fabrication and preparation: The selected components are prepared, and the site is checked for the required access, utilities, and installation conditions.
Installation and commissioning: The sauna is assembled, the relevant components are checked, and the equipment is commissioned according to the manufacturer’s requirements.
WellnessPro provides an end-to-end approach that includes design, fabrication coordination, installation, and final commissioning. Depending on the project, permits and electrical work may also need to be coordinated in accordance with local requirements.
The schedule depends on the size, materials, equipment, and site readiness. Confirm the expected timeline and exactly what the quotation includes before approving the project.
Benefits of Adding a Home Sauna
A well-planned sauna can offer several practical advantages for homeowners.
- Convenience: Enjoy a dedicated wellness space without travelling to a spa or fitness centre.
- Personalized design: Select the size, heating system, wood finish, and seating arrangement to suit your home.
- Better use of unused space: Transform a suitable spare room or home gym into a functional area.
- Privacy: Use the sauna in a familiar setting according to your own routine.
- A coordinated home environment: Integrate the sauna with storage, lighting, a shower, or other wellness features.
Sauna use should follow the manufacturer’s instructions. Stay hydrated and leave the sauna if you feel dizzy or unwell. If you have medical concerns, consult a qualified healthcare professional before regular use.
Conclusion
Turning an unused room into a wellness suite requires thoughtful planning, but the result can be a practical addition to everyday home life. Choosing the right heating system, selecting appropriate materials, and addressing ventilation and electrical requirements early can help you avoid unnecessary complications.
Whether you prefer a traditional cabin or an infrared setup, custom design allows the sauna to fit the space you actually have.
If you are considering sauna installation in Orlando, WellnessPro can help you explore the available designs, materials, and installation requirements. Contact the team to discuss an infrared sauna in Orlando or a complete home wellness space tailored to your property.

- What Does Full Service Removals Actually Mean?
- What’s Included in a Full Service Move?
- How Much Do Full Service Removalists Cost in Sydney?
- Full Service vs DIY vs Hire a Truck: Which Wins?
- How to Choose the Right Full Service Removalist in Sydney
- Why Sydney Moves Especially Need Full Service
- FAQs
- What is the difference between full service and standard removals?
- How far in advance should I book removalists in Sydney?
- Do full service removalists pack everything?
- Is transit insurance worth it?
- Can I get a fixed price instead of an hourly rate?
- Ready to Move Without the Stress?
Moving house in Sydney is stressful enough without doing all the heavy lifting yourself. That is where full service removalists Sydney come in. Instead of packing boxes for weeks, hiring a truck, and begging friends to help on moving day, a full service team handles everything from the first box to the last piece of furniture in your new home.
But what exactly does “full service” include? How much does it cost in Sydney? And how do you pick the right team? This guide answers all of it.
What Does Full Service Removals Actually Mean?
A full service removalist does not just show up with a truck. The team manages your entire move from start to finish. You point at what needs to go, and they take care of the rest.
With full service removalists Sydney, you do not lift a single box. The crew brings packing materials, wraps your belongings, loads the truck, drives to your new address, unloads everything, and can even unpack for you. It is the closest thing to a stress free move.
This is very different from a standard removalist, who usually only loads, transports, and unloads. With full service, the packing, the materials, and the careful handling of fragile items are all part of the deal.
What’s Included in a Full Service Move?
Every company defines its package a little differently, but a proper full service move in Sydney should include:
- Professional packing. Trained packers wrap your kitchenware, electronics, artwork, and furniture using quality materials. Fragile items get extra protection.
- Packing materials supplied. Boxes, bubble wrap, packing paper, tape, and mattress covers are all provided. You do not need to buy anything.
- Furniture disassembly and reassembly. Beds, tables, and large wardrobes are taken apart for safe transport and put back together at the other end.
- Loading and transport. The team loads the truck in the right order so nothing shifts or breaks during the drive.
- Unloading and placement. Boxes and furniture go into the correct rooms, not just dumped at the front door.
- Unpacking service (optional). Many Sydney removalists offer unpacking as an add on, so you can walk into a liveable home on day one.
- Transit insurance options. Your belongings are covered while they are in the team’s hands.
Before you book, ask for the inclusions in writing. A trustworthy company will list exactly what is covered and what costs extra.

Removalists carefully loading boxes onto the truck
How Much Do Full Service Removalists Cost in Sydney?
Price depends on the size of your home, the distance, and how much packing you need. As a rough guide for Sydney in 2026:
- 1 bedroom apartment: $600 to $1,100
- 2 bedroom home: $900 to $1,600
- 3 bedroom house: $1,300 to $2,200
- 4 bedroom house: $1,800 to $3,000+
These are full service prices, so packing labour and materials are built in. A standard (non packing) move for the same homes would cost roughly 30 to 40 percent less, but then you are doing all the packing yourself.
The biggest cost drivers are access issues (stairs, no lift, long carry distances), the volume of belongings, and peak day surcharges. Moving on a Saturday or at month end in Sydney almost always costs more than a midweek move.
To avoid surprises, always get a fixed written quote after an inspection or a detailed inventory. The cheapest quote on the phone often grows on moving day. If you want honest pricing with no hidden fees, get a free moving quote and compare it against two others before you decide.
Full Service vs DIY vs Hire a Truck: Which Wins?
Doing it yourself looks cheaper until you add everything up. Truck hire in Sydney runs $150 to $300 a day, plus fuel, plus boxes and wrap (easily $200+), plus the value of your time and the risk of injury or damage.
Then there is the hidden cost: a DIY move usually takes two to three times longer. Packing a 3 bedroom house properly takes one person about 3 to 4 full days. A professional team does it in one.
Backloading (sharing truck space) is cheaper for interstate moves but you lose control over timing. Your belongings travel on someone else’s schedule.
For local Sydney moves, full service wins on total value once you count your time, the packing materials, and the lower damage risk. For interstate moves from Sydney, compare full service against backloading based on how flexible your dates are.
How to Choose the Right Full Service Removalist in Sydney
Sydney has hundreds of removalists, and quality varies wildly. Use this checklist:
1. Check reviews across platforms. Look at Google reviews with attention to how the company responds to complaints, not just the star rating.
2. Confirm they are insured. Ask what transit insurance is included and what it covers.
3. Get everything in writing. The quote should list inclusions, the truck size, the team size, and arrival windows.
4. Ask about their team. Are they trained employees or day hire labour? It matters for how your belongings are treated.
5. Watch for red flags. No physical address, cash only payments, or quotes given without asking a single question about your home are all warning signs.
A good removalist will ask about stairs, parking access, and fragile items before quoting. If they do not ask, they are guessing, and you will pay for that guess later.
Why Sydney Moves Especially Need Full Service
Sydney is not an easy city to move in. Narrow streets in the Inner West, high rise apartments with strict lift booking rules in the CBD, steep driveways on the North Shore, and limited parking in the Eastern Suburbs all make DIY moves painful.
Professional teams deal with these problems daily. They know which buildings need lift bookings, how to protect common areas from damage claims, and how to load a truck so it survives Sydney traffic and tight turns.
If you are moving into or out of a strata building, check the by laws for moving hours and lift bookings before moving day. Your removalist should remind you of this, but many do not.
FAQs
What is the difference between full service and standard removals?
Full service includes professional packing, materials, disassembly, transport, unloading, and optional unpacking. Standard removals usually cover loading, transport, and unloading only, and you handle all the packing yourself.
How far in advance should I book removalists in Sydney?
Book 2 to 4 weeks ahead for a normal move, and 4 to 6 weeks ahead for month end, Saturdays, or the December to January peak. Last minute bookings are possible but you will pay more and get less choice.
Do full service removalists pack everything?
Yes, unless you tell them otherwise. Most people ask the team to skip personal documents, valuables, and anything they want to transport themselves. Just point out what stays with you before packing starts.
Is transit insurance worth it?
Yes. Even the best teams can hit a pothole or brake hard in Sydney traffic. Transit insurance is cheap compared to replacing a damaged TV or dining table. Ask what is included as standard and what the upgrade options are.
Can I get a fixed price instead of an hourly rate?
Yes, and you should. Fixed quotes protect you from slow work and traffic delays. Make sure the fixed price is based on a proper inventory or inspection, not a guess over the phone.
Ready to Move Without the Stress?
A full service move costs more upfront than doing it yourself, but most Sydney families find it pays for itself in saved time, avoided damage, and pure peace of mind. The key is choosing a team with real reviews, proper insurance, and a written fixed quote.
Start with a free, no obligation quote and see exactly what your move would cost. It takes two minutes and there is no pressure to book.

What Should You Know Before Moving to Mississauga?

How to Choose Durable Materials and Ensure Long-Lasting Protection for Your Home

Home Window Tinting: A Practical Guide to Better Privacy, Comfort, and Energy Efficiency

Alex Pettyfer Net Worth, Wife, Age, Height, Children, Career and More

Brad Williams Net Worth, Wife, Height, Age, Daughter, Family, Career and More

Eldorado.gg Review 2026: How It Works, Safety, Fees, and Risks
-
Celebrity10 months ago
Alex Pettyfer Net Worth, Wife, Age, Height, Children, Career and More
-
Celebrity10 months ago
Brad Williams Net Worth, Wife, Height, Age, Daughter, Family, Career and More
-
Blog2 months ago
Eldorado.gg Review 2026: How It Works, Safety, Fees, and Risks
-
 Anime11 months ago
Sanzoku Bandits of One Piece: Origins, Higuma, and Their Role in Dawn Island
-
 Celebrity10 months ago
John McGinn Net Worth, Age, Height, Wife, Childrens, Career and More
-
 Celebrity10 months ago
Frances de la Tour Net Worth, Age, Height, Husband, Childrens, Career and More
-
 Celebrity11 months ago
Will Trickett Net Worth, Wife, Childrens, Age, Career and More
-
 Blog2 months ago
Crackstube: A Complete Guide to the Digital Publishing Platform